
Imagine a world with marshmallow trees and whipped cream days. A place where the sun shines so your nose won't freeze, and marshmallow clouds are being friendly. Doesn't that sound so fun! These images come from the song 'It's a Marshmallow World', which was the inspiration in creating a whimsical marshmallow wonderland for my kids that will keep them dreaming all Winter long.


Our wonderland has a tree that is made up entirely of 'mints', a tree topped with yummy whipped cream, and a 'fur' tree that is softer than any fir tree we've ever known!

For all Five Trees
Cut a tree branch in varying lengths for the trunks of the trees. It's best to use a saw, but large pruning shears will work okay. For the tree bases, cut a small log into varying sizes. Hot glue the branch to the log (use plenty of glue) and then glue moss around the base of the trunks.


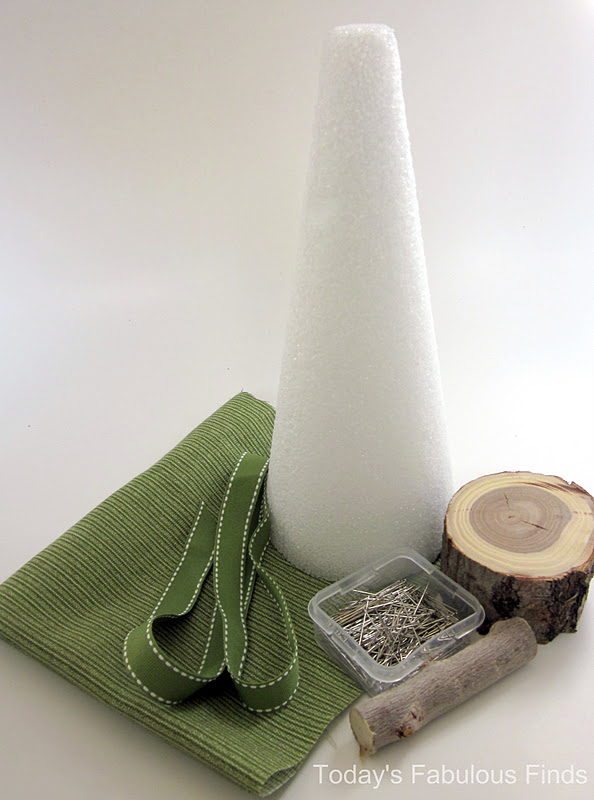
Tree #1: 'Fur' Tree


Supplies Needed:
- One 12" x 4" Cone of STYROFOAM™ Brand Foam
- 13" x 17" Faux fur remnant
- Ribbon
- Extra long satin pins
- Hot Glue Gun

2. Pin along the side, then cut the fur next to the pins.
3. Fold the fabric on the end up to the base. Cut the fur to fit the base.
4. Pull the fur together on the side, overlapping it slightly, and pin it in place. Trim if needed.

6. Cut a small hole in the circle of fur at the base large enough to fit the diameter of the branch for the trunk.
7. Fold the fur under at the edges and pin it in place at the base.
8. Wrap the ribbon around the tree on a diagonal. Pin at the top and the bottom. Cut the ends of the ribbon on a diagonal to reduce the risk of fraying.
9. Hot glue the tree to it's base.
Tree #2- 'Peppermint' Tree

Supplies Needed
- One 8" x 3" Cone of STYROFOAM™ Brand Foam
- 13" x 14" Fabric Remnant (A heavier decorator fabric works nicely.)
- Ribbon to Embellish
- Extra Long Satin Pins

1. Wrap the fur around the cone of STYROFOAM™ Brand Foam on a diagonal, overlapping the fabric.
2. Fold the fabric on the tree top under and pin in place by sticking the pin straight in to the cone of STYROFOAM™ Brand Foam.
4. Fold and pleat the fabric at the tree base, pin in place.
5. Trim the extra fabric, leaving an opening that is the size of the branch for the trunk.
6. Hot glue the tree to it's base and pin the fabric close to the cone of STYROFOAM™ Brand Foam.
7. Pin a ribbon(s) around the top and around the base of the tree. The finished tree pictured in the vignette has on ribbon over top of another.
Tree #3-(No Sew) 'Whipped Cream' Tree


Supplies Needed
- One 6" x 3" Cone of STYROFOAM™ Brand Foam
- 2 1/2" Strip of 45" wide fabric in white and one 4" white fabric square
- 2 1/2" Strip of 45" wide fabric in green (or another accent color)
- Extra Long Satin Pins

1. For the Ruffles: Of the green fabric, cut two 2 1/2" x 11" strips, one 2 1/2" x 10" strip, and one 2 1/2 x 9" strip. Of the white fabric, cut one 2 1/2" x 11" strip, two 2 1/2" x 10" strip, and a square 4" x 4" piece for the top.
2. The order of the ruffles starting from the bottom is: 11" green, 11" white, 11" green, 10" white, 10" green, 10" white, 9" green, and white 4x4 square on the top.
3. Fold the fabric strips in half. Wrap the bottom strip around the bottom of the cone of STYROFOAM™ Brand Foam overlapping the edges. Pin it.
4. Pin the fabric strip on the opposite side, then again in the middle of the other sides and then once more to gather the ruffle.
5. Make a 'bubble' of white fabric (steps shown below), pin it to the top of the tree. Tuck any raw edges under and pin it so the bubble of fabric hides the pins.
6. Glue the tree to it's base.
Tree #4-'Marshmallow/Bubble' Tree


Supplies Needed
- One 12" x 4" Cone of STYROFOAM™ Brand Foam
- One package of sixteen 1" Balls of STYROFOAM™ Brand Foam
- 3/4 yd of 58" wide heavy weight white fabric (The tree pictured is made of white stretch taffeta.)
- Paint
- Extra Long Satin Pins

The Marshmallows/Bubbles
(This tree was inspired by my Burlap Bubble Wreath. I thought it would be fun to try the bubble on another shape.)
A pin is used in the pictures to show where you will hold the fabric with your thumb and index finger when folding it. You don't need to pin it until step five.
1. Cut six 4" strips that are 58" long and then cut each strip into 4" squares.
2. Fold the square in half to form a triangle. Take the right hand corner (pinch one layer of the fabric on the very tip) and bring it to the front. Line up the corners.
3. Take the left hand corner (pinch one layer of fabric on the very tip) and take it to the back. Line up the corners.
4. All four corners should be lined up at the bottom. Puff out the center, it should be in a bubble shape now.
5. Pin through all four layers of fabric.
6. Pin the 'bubbles' to the cone of STYROFOAM™ Brand Foam. Pin one bubble on and then place the next one close to it so that it hides the pin on the one that you just added. The bubbles should be just close enough so that you don't see any of the cone of STYROFOAM™ Brand Foam or the pins.

Polka-Dots/Berries (To add a little whimsy.)
Push a pin through the center of each of the sixteen 1" balls of STYROFOAM™ Brand Foam. Hold onto the pin to paint them. Let fully dry. Push the pin in between the bubbles on the tree.

Tree# 5- 'Mint' or 'Jelly Bean' Tree


Supplies Needed
- One 6" x 3" Cone of STYROFOAM™ Brand Foam
- Bag of baby lima beans
- Hot glue gun and glue
- Accent ribbon
- Off white spray paint

1. Glue the beans on in rows one at a time with hot glue until the tree is completely covered.
2. Pick off any strands of hot glue, then spray paint it with off-white spray paint.
3. Glue the tree-top onto the trunk and base and pin a ribbon bow to the top.
Subway Art Sign

Supplies
- One 12"x18" Board of STYROFOAM™ Brand Foam
- Four 1/4" x 3" x 24" Poplar Boards (They actually measure 2 1/2 inches wide, not a full 3" and can be found at Lowes.)
- Four large 5 gallon size paint sticks. You can buy them at some paint counters. (You could also use ribbon instead.)
- Dark Walnut Stain
- Off-white Paint (Sherwinn Williams Alabaster was used for this sign.)
- Sand paper
- Hot glue gun and hot glue
- Black spray paint or craft paint

1. Spray paint the front of the 12" x 18" board of STYROFOAM™ Brand Foam. Be careful to keep the coats light. If you spray too heavily in one place it can damage it. (This step is only necessary if the white color will show through between the wood slats, you could also use craft paint.)
2. Cut the 1/4" x 3" x 24" poplar boards in half. Measure first before you cut. You may need to trim them down some so the will fit. Cut the paint sticks to fit around the board of STYROFOAM™ Brand Foam.
3. Use a rag to stain the 4 paint sticks and the poplar boards with dark walnut stain. Let fully dry.

4. I used a vinyl cutting machine and contact paper to make a stencil for the subway art. The font used is called Latha. Another option is to print out the words you want to use and cut out a stencil with an exacto knife. You could also print the subway art words on your home computer, take it to a copy center and copy it (prevents the Mod Podge from smearing the print), then trim to size and Mod Podge onto the boards.
5. If you are using a vinyl cutting machine: Cut out the subway art words onto contact paper. Weed out the background. Apply the lettering to the boards and paint over it. It may take 2 coats. While the paint is slightly dry yet still tacky, pull up the contact paper with some tweezers. Let dry and then sand to distress, sand all edges and lightly over the top of the stencil.
6. Glue the paint sticks around the perimeter of the board of STYROFOAM™ Brand Foam. Glue each board slat into place with a dot of hot glue on each side.


*I'm planning to buy more boards to put on the back of the subway art to make it reversible. I'll use words that are not seasonal so the board can be used year round.


This was a lot of fun to put together and has now given me a reason to look forward to the month of January. :)
Edited to Add: If you'd like to see my full Marshmallow Wonderland Mantel and My Christmas Mantel, click here.


Linking to: Beneath My Heart Creations by Kara Tator Tots and Jello Funky Junk Interiors Creation Corner Someday Crafts Domestically Speaking Blue Cricket Design Today's Creative Blog Home Stories A to Z
Disclosure of Material Connection: I received one or more of the products or services mentioned in this post for free in the hope that I would mention it. Regardless, I only recommend products or services I use personally and believe my readers will enjoy. I am disclosing this in accordance with the Federal Trade Commission’s 16 CFR, Part 255: “Guides Concerning the Use of Endorsements and Testimonials in Advertising.”


45 comments:
Oh wow, I am totally blown away by how awesome all these little trees are. And the subway art is just adorable! I want to do all of it for my house! So completely beautiful!
I LOVE absolutely everything about this decor. I want to replicate it exactly! I thought your bean tree was made from mashmallows just seeing the first picture though, inspired by the song. Just absolutely beautiful!
I would love to put your picture as my desktop, because that's as close as I'll get to replicating this, but it stretches too much on my screen. Any chance you'd have a higher resolution picture you could send me (and no I am no kiding!!I DO love it that much)?
Oh my goodness I just love these!!
how fabulous! everything! the colors, the sign, your trees. awesome job.
All of the trees go so well together and are super cute the sign is just the cherry on top! Well done:)
You must have had so much fun creating your Marshmallow World! I love the color-scheme.
: )
Julie M.
ps I stopped by via your comment on Tip Junkie! I read it after posting mine…and realized they were almost the same. Ha!
These trees are beautiful, such great ideas! Thank you for sharing!
Karah @ thespacebetweenblog
Hi! I'm visiting from my sister's link part (Home Stories A to Z). I have to tell you how much I LOVE this entire project! Clean, and bright, and all the different textures! Gorgeous! I'll be sharing this on my FB page today!
simply fabulous, janet! such clever trees and your subway art is so gorgeous!
I love the whole vignette. But I love, love, love the bubble tree and the sign especially!
Shannon
I've already said how much I absolutely LOVE this project! If you get a chance, I would love for you to link it up to my party, The Creative Spark. I pinned this too!
Jenn :)
I LOVE your Subway art! Thank you for the detailed instructions. I just pinned it and definitely plan on actually making it ;) I'm your newest follower! Oh, adorable trees too.
xo,
Laurie @ Gallamore West
ADORABLE!! Love Love it all. You do amazing work! Your newest follower,
April@myfriendscallmesuzy.com
I love your blog! :) I hope you don't mind that I became a follower of your blog! :) Erin
Absolutely wonderful, a lot of love and patience went into your display :) Love your blog.
Stunning display and wonderful creativity!
the whole scene looks darling! Love the shade of green you chose with the white!
These trees are so cute! I'll be pinning them for sure. Glad to find you on tt&j linky party :)
Adorable Adorable!!
I pinned it and featured it on my TT&J facebook page :)
xoxox
Jen
So ridiculously cute!! Pinned! XO
Super cute! Love the marshmallow subway art... you're in the PoPP Spotlight this week. Thanks for linking up.
So cute!!! I'm in love with the green and white because green is my favorite color. I would LOVE it if you would share this at my Weekend Warrior Link party on Monday.
Anna
www.askannamoseley.com
Great Tutorial, thanks so much for sharing. I am going to pin this!
Hope you are having a wonderful turkey weekend.
Caro
Posting this on my facebook page Cheri Childers Peoples
Such a wonderful christmas project. I cant wait to get my machine so I can make this sign!
Love the trees! So funny as I didn't think many people knew that song! I just posted my Marshmallow World Wreath which reminds me of that song I sang back in grade school!
Kelly
Way too cute...I love everything you did...soooo sweet!!!!
evie @ brown paper packages
Absolutely wonderful! I especially love the sign - DD is singing that song now with choir. Now I NEED a Cameo! :)
WOW! Do you make house calls! I am so impressed with all of that homemade stuff! It turned out amazing. You should come and enter my Vanilla Bean Paste giveaway http://eatcakefordinner.blogspot.com/2011/11/vanilla-bean-paste-giveaway.html
Love it all!!! The subway art is fabulous ( one of my favorite Christmas tunes ) with the various handcrafted trees.
Me again! Just wanted to tell you again how crazy fabulous this is. I'll be featuring it tomorrow - thanks so much for linking up to The Creative Spark. Enjoy your Sunday!
Jenn :)
I love this! The colors are beautiful and the trees are so neat! Thanks so much for sharing!
So, so beautiful!!! Next year I'll have a mantel at Christmas time and this is what I want to have on it.
Just stopped by to say that I love, love, love this vignette. So many great ideas and such an adorable theme. Thanks for sharing.
This is beyond amazing! I love the natural wood logs you used for the base of the trees!
So funny that I found this post today. I've been singing this song all day. :)
This is beyond cute! I love the trees so much and the subway art...adorable!
Gorgeous stuff! I found you on Pinterest. I just wish you would sell your items.
Erica Bohrer's First Grade
Thanks Erika! I've thought about opening a shop, so who knows maybe someday I'll actually do it. :)
Oh.my.word! That sign is amazing!! :) You never cease to amaze me, my dear!!
SHUT THE FRONT DOOR! This is one of the cutest Christmas displays I've ever seen. How adorable. And you did a great job on the tutorials. Thank you for inspiring me!
Warmly, MIchelle
Precious! I love this vignette. I am featuring it in my next post! :)
Thanks for linking up!
Love it!!! I had to pin it so I wouldn't forget about it...It's a great mantle that you could leave up all winter...I would love for you to share it at my "18 Days til Christmas" Linky party...
http://mydailyphotojourney.blogspot.com/2011/12/18-days-til-christmas-linky-party.html
www.mydailyphotojourney.blogspot.com/
www.facebook.com/MyCrazyBeautifulLife.13
www.pinterest.com/denyse13/
I am in love with these color and the mantel is so stunning. I featured it on my "This Weeks Pinterest Loves" post on my blog yesterday. Come and check it out here and grab a feature button from my side bar. http://tyandwhitneyulrich.blogspot.com/2011/12/this-weeks-pinterest-loves-18.html
A mommy's life...with a touch of YELLOW
tyandwhitneyulrich.blogspot.com
What a gorgeous mantel! Your trees are precious and your tutorials are so easy and clear to follow. LOVE! Love your 2nd rendition for Christmas too!
I shared this on FJI Facebook and pinned it for SNS 112. :)
https://www.facebook.com/photo.php?fbid=10150513173576141&set=a.192514281140.164586.175378011140&type=1&theater
Donna
Yep I love it! I want one :)
Post a Comment