
There are so many advantages of using wheat grass centerpieces, not only do they bring life and color to the table, but they can be made for just a few dollars (or less) depending on what you have on hand. You can't buy nice wood planters for anywhere close to that price (if you can even find them this early in the year in your area).

Just like the paint stick crate I made last year, there are endless possibilities of what you could fill this box with. Click here for a few ideas.
I took a walk around Lowe's in search of the cheapest rustic wood that I could find that would make a good planter. The winning piece was a 1"x4"x6' (really measures 3 1/2" wide) dog eared cedar fence slat for $1.09. You can make one 4 1/2" x 18" box out of just one slat.
Supplies:
- 1 dog eared cedar fence slat--1" x 4" x 8' (It really measures 1/2" x 3 1/2" x 6'.)
- Miter Box and Saw
- Wood Glue
- Sandpaper
- Tape Measure
- Staple gun and Staples (or small tacks)
- Clear Plastic (can use a shower curtain liner from a dollar store)
- Hammer and Nails ( 1 5/8", Ring Shank, Dark Brown )
- Dark Walnut Stain (optional) and a rag

Directions:
1. Measure, mark, and cut three 18" pieces from the slat. Measure from the straight end of the slat, the dog-eared end can be used to make a square box if you are making multiple boxes, so you might want to save it.
2. Line up the three pieces, one for the bottom, two for the sides.
3. Line the remainder of the uncut slat up to the end of the boards, making it flush with one side. Mark it and cut.
4. Run a line of glue along the side of the bottom. Line up the side (using the other side underneath it to balance it) and hammer into place. Repeat for the other side (using one of the ends to balance it).
5. Run a line of glue around the ends of both sides and hammer on the ends of the box, make sure you stagger the nails.
6. You can stop right here if you want a natural look, or you can stain it. I used a rag and Minwax Dark Walnut stain on this box.

Please note: There is a strong possibility that when you water the grass, some of the water will trickle in-between the plastic and the wood and leak through the box (remember this is a rustic box). Don't set it on something nice that could be ruined if it gets wet. If you are using it outside, it would be a good idea to drill a couple of holes in the bottom of the box for drainage.
From what I've read wheat grass only needs about 2 1/2" of soil to grow. I took some of the dirt out of the box after I took these pictures to lower the soil level. I want the roots of the grass to be hidden by the box so only the pretty green is showing. I'm hoping this will work. Also, on the next boxes I plant, I'll put in a layer of sand or small rocks under the soil for drainage purposes.

This is my first time growing wheat grass, but it seems (again from what I've read) that it's pretty hard to mess it up. These are the steps I've followed up to this point (the end of day three).
1. I soaked the wheat (some call them berries, others called them seeds) overnight (8-12 hours) in a bowl of water. The wheat swelled up and doubled or tripled in size.
[Edited to add: You can buy the wheat in the bulk food section at a grocery or organic food store. The variety I used is called hard red wheat. It's the same wheat that you would buy to grind into wheat flour.]


3. To keep the wheat damp, I sprayed it every so often with a squirt bottle, I think I watered it three times today (day three).
In the picture above you can see where I covered it with a piece of cardboard. Some say to cover it for the first two days, but I had extra wheat leftover in the bowl that was uncovered and it sprouted at the same time if not sooner, so next time I won't bother to cover it with cardboard. I did cover it with some saran wrap today though once I saw little sprouts. I think this help some to keep the wheat damp and the soil warm--we'll see! :) Update: The next morning it was starting to grow mold so I won't cover it with saran wrap next time.
So now as I'm writing this, I'm moving into day 4. Supposedly I'll have nice tall grass by day 8 or 10. (Right now that's hard for me to believe.)

I didn't want to be the only one having all the fun, so I'll be posting a picture each day (except Sunday) on my sidebar to show you how much it grows each day. We can all literally 'sit around and watch the grass grow' together. And If I fail...well then you'll know what not to do. :)
Have you had success growing wheat grass? Any tips for me?
Today's Fabulous Find...Rustic Wheat Grass Planters

Yep, that's mold you see there. I was so disapointed when I checked on the wheat grass this morning and saw it. I think it was probably a combination of over-watering and the saran wrap so I took the saran wrap off and held back on the watering. I used to start my flowers for my yard from seeds and have had this happen before. The flowers ended up growing fine, so I think there's still hope for the wheat grass.

You can see that by evening the mold wasn't as bad. It's exciting to see little green shoots coming from the wheat! I imagine if we'd had a sunny day today we would have seen even more growth.
I'll post day five on Monday. Do you think it will make it to an inch tall by then? Hmmm... ;)
Oh, and these are a couple of my inspiration photos.
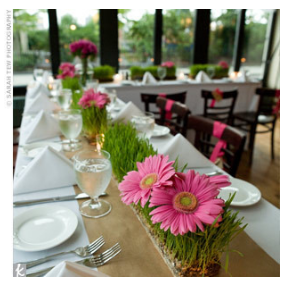 |
| source |
 |
| source |
Day five was overcast and cloudy (we didn't see any sunshine all day) yet the grass managed to grow--take a look!


Day six: It's amazing what a little bit of sun can do for a plant, the grass nearly tripled in height today. My kids were amazed at how tall it had grown just while they were away at school. They like to run their hands over it now and let it tickle their palms. I LOVE the color of new green grass. :)


Day Seven: I took a picture today in the afternoon because I wanted you to see how beautiful the color is. It really is this green! My kids now run their hands over the grass every time they walk into the room. I feel like we've cheated mother nature and spring has come early. I LOVE it!


Day Eight: It continues to grow and is even fuller than the day before. The grass blades have widened at the top and are full and thick.

Day nine: The grass is to it's optimal height today and would be just the right height to use for a centerpiece or for decorating in the home.


From my experience, what I read is correct, wheat grass is very easy to grow and grows very quickly at just 8-9 days from start to finish. Other than the mold scare on day four, it went really well. I learned to touch the soil with my finger to see if it needed water. If it was still damp, I waited to water it for awhile.
I highly recommend giving this a try, especially if you live in a colder climate and are ancy for Spring. :)
Update:
In response to a comment: Yes, you can trim it and will need to several times through the life of the grass. I just use scissors and 'give it a haircut'. Sometimes I take it outside, but if it's cold I just hold it over the garbage. The first box that I planted was ready to be thrown out on day 21, so it was green for around 2 weeks, but I think I over-watered it. The second set of boxes that I planted are on day 15. I'm keeping track to see if they do any better. A friend planted some in a deep pot and it has lasted for several weeks. I'm wondering if it's because it has more depth for the roots. The roots in the boxes eventually become so bound, that I think it stunts the growth of the grass, but I'm in no way an expert on the subject, so I could very well be wrong. :)
Click here for Wheat Grass Part 2: Growing Wheat grass on paper towels!

Linking up to: The 36th Avenue The Shabby Creek Cottage Creations by Kara Someday Crafts Lil' Luna Oopsey Daisy Not Just A Housewife Today's Creative Blog Home Stories A to Z Skip to My Lou Under the Table and Dreaming Craft Catwalk I Heart Naptime Funky Junk Interiors Tator Tots and Jello Serenity Now Pocket Full of Pink


48 comments:
this will be interesting to watch what happens--i've never grown wheat grass!
I can't wait to see this one. How fun. Hugs, Marty
I have never grown it but am excited to see how it goes!
I actually just googled wheat grass so I could see what it's going to (hopefully) look like in the end. I can't wait to watch it grow.
This is so cool Janet! I love the planter and I hope the wheat grass works out for the RS mtg! A great idea:)
I found you from Brooke at "Get out of my head please" Oh my gosh you are my most favorite ever!!! You speak to my soul. I too am a Christian and making heart felt gifts is what I am all about. Thank you for sharing your most amazing talent not only with me but the public as well!!!! <3
This is going to be absolutely a stunner outside your house or when put in the windows! :D
Awesome, I am going to bookmark this. I was just thinking about growing some grass indoors for some mantel decor. Great tutorial!!!
I wanted to do this last year for spring and time got away from me. Thanks for the reminder. It looks beautiful and that box is to die for! Visiting from TT&J.
You are right...growing grass for inexpensive centerpieces is great!
I did about 40 last year for baseball dinner...here is the blog link if you would like to see it:
http://misskopykat.blogspot.com/2011/04/more-grass-centerpieces.html . I have two more events I am growing grass for this spring. I have one batch that is about a week old for a March 3rd event. It is not as high as yours but I have learned not to worry about it too much...eventually the grass grows but timing is everything for an event.
I love this project. I have been wanting to grow my own wheat grass. Thanks for sharing.
Smiles, Paula
Love love love it! The box and the grass... and in 9 days... hard to believe!
Shared on FJi Facebook and pinned for SNS 121. :)
https://www.facebook.com/photo.php?fbid=10150656143391141&set=a.192514281140.164586.175378011140&type=1&theater
Donna
I LOVE this!
wow great tutorial!! i love the look of wheat grass-i had no idea it was so easy!!
wow great tutorial!! i love the look of wheat grass-i had no idea it was so easy!!
Thanks for the tutorial! I have spring fever SO bad and this is just what I need to do. grow something green ans happy. I am going to do this with my children this week. Thanks again. Found you on pinterest.
Lindsay @ countrygirlhome.blogspot.com
This is so cute! I love how vibrant the wheat grass is and how quickly it grows! Love your wood box too!
I love it... so beautiful. How long does it live or stay green? Where do you buy wheat seeds? Never thought about it. Thanks for posting!
To Sharon: I'm not sure how long it will look nice, but I'm keeping track and will post an update when it starts looking bad. I'm curious too! :)
The wheat is just regular (uncracked) wheat that you would buy in the bulk food section at a grocery or organic food store. (The same wheat that you would buy to grind into flour.)
I'm glad you asked, thanks for your comment!
So cute! I've always wanted to do this too, you've re-inspired me! Where did you get the wheat berries from? Little Bit from DecorateWithaLittleBit p.s. I'm pinning this too!
To Little Bit: It's such a fun project to try, I think you'll enjoy watching it grow! I bought the wheat at a local grocery store in the bulk food section. The variety I bought is called hard red wheat.
I'm so glad I came across this!! My hubby bought wheat grass seeds a couple of weeks ago, and I still haven't done anything with them because the kit came with these ugly plastic pans to grow the wheat grass in. I've been wanting to make something more decorative for it, and this is just the inspiration I needed! Your wood tray looks great!
Glad to hear it grows so fast, too. We're growing ours for juicing, so we need lots of it!
I've always wanted to do this and never have done it. But my girls follow your blog too and we're excited to try it this year. I love your blog Janet. Very creative! And your dad must be proud of your wood working skills. I need a tutorial from you!
To Steph: I can't say enough how fun it was to grow the wheat grass. Maybe it's partly because I can't wait for spring! Thank you for your sweet comment and for reading my blog, comments like yours keep me posting. :) What I know about woodworking, I've learned from my Dad and I'm so grateful to him for it. My Dad's a very talented carpenter and I'm excited to be showing you a couple of the things he's made very soon!
This is awesome, great tutorial!
Wow, I have ALWAYS wanted to try growing wheat grass. You make me think I could almost pull it off! :) Thanks for sharing, Janet!! Love your day by day photos!!
you've helped me make up my mind to grow me some wheat grass again this year - FOR SURE! your version is LOVELY and fresh and springy! yum! i'm also your newest linky follower & would love to have ya pop over for a visit anytime!
www.NorthernCottage.net
how much wheat for the little box you made and how big of a bowl of water and how much water????
To Rachel: I didn't ever measure the amount of wheat that I ended up using, but I think if you soak 1/2 cup of wheat (or a little more to be sure) that will give you enough to cover the soil in the box and you will most likely have extra. I guessed and ended up throwing some out, but at .58/lb I didn't feel too bad about it.:) Place the wheat in a bowl with at least twice as much water as wheat so there is plenty of water for the wheat to expand. If you need to add more water you can, basically the wheat just needs to be submerged. Let me know if you have any more questions! :)
These are beautiful! Pinning this to my tea party board as I think these would make adorable party favors planted in old tea cups! Thanks for the information!
Does the wheat stop growing? Or do you need to trim it or something if you were going to use it as a decoration indoors? Did you find out how long it will last?
Yes, you can trim it and will need to several times through the life of the grass. I just use scissors and 'give it a haircut'. Sometimes I take it outside, but if it's cold I just hold it over the garbage. The first box that I planted was ready to be thrown out on day 21, so it was green for around 2 weeks, but I think I over-watered it. The second set of boxes that I planted are on day 15. I'm keeping track to see if they do any better. A friend planted some in a deep pot and it has lasted for several weeks. I'm wondering if it's because it has more depth for the roots. The roots in the boxes eventually become so bound, that I think it stunts the growth of the grass, but I'm in no way an expert on the subject, so I could very well be wrong. :)
They also sell these already grown as "pet grass". I just bought one for the first time last week for my cats, but they aren't interested in eating it. I think it's the only plant they aren't interested in, so it's good to know that I can grow my own easily. Great post! Thanks!
This is so beautiful!! Thank you for showing a non-grower like me how easy it is!! :) I showed it to my husband and he liked it so much he's ready to build me a box!! :)
Loved the wheat grass planter. We are still forcasting chance of snow, so I had my husband build me a planter. I bought some miniture daffadil starts at Walmart and planted them at the same time as the wheat they have been blooming away, but with little sun it took my grass a while to start but it is finally coming. Put the box in my kitchen window, LOVE IT. Thanks
I love the idea of Daffodils growing with the wheat grass! I'm sure it looks so pretty and smells so wonderful! I'm going to try it myself, thanks for sharing this. :)
I can't find the wood needed the only fencing is 6' not 8' where did you find it? Just to be sure it was a 1x 3 x 8
Oh no, I'm sorry I didn't realize I typed in the wrong measurements. It should be 1"x4"x6'. I was way off! (It will really measure 3 1/2" wide.)( I hope it didn't cause you too much trouble. Thanks for bringing it to my attention!
Thanks, I did the math but just had to be sure lol making these for my dads 60th party going to put golf tee and flag on top hope they turn out as good as yours!
Trisha that's such a fun idea! I'm sure your boxes will look great and your dad is going to love them!
I love the idea. Im going to try this:)
It isn't mold, it is the little hairs coming alive that eventually turn into roots. Great post, I'm make 16 of these right now.
To beau.shaunalee: Sixteen, that will keep you busy for awhile! You will feel like Spring has arrived. :) Thanks for your comment!
I know it has been years since you posted this but I love it! I was going to do fake tall grass in my 4ft window box on my kitchen island but maybe I will try this instead. I have grown a few things but never wheat grass so this may be fun. Most recently I started growing my microgreens(so far just kale). Have you tried keeping them in darkness (damp but not wet) for 3-4 days until they sprout and then introduce the light the last few days (microgreens only take 10 days to go from seed to ready to eat and they are so good!). Also you never had mold, the white hairs on the roots are referred to as "root hairs". Also, I saw that you were going to try and make them for a golf party, and you just gave me a great idea for party centerpieces! Good luck and thank you for the inspiration!
To Kelley: Yes, you should try it, it's so fun to grow! I haven't ever tried keeping it out of the light for that long. I've learned since this post about root hairs, in this case you are right, it was root hairs. Unfortunately I have had mold grow on my wheat grass a couple of times though when it was too wet. Thanks so much for your comment, have fun with your centerpieces. :)
Love this! I grow wheatgrass in a cute little metal pot from Ikea - only ever grow it for my cats though, never really thought to turn it into more of a centerpiece as well! Especially since they Insist on jumping on the kitchen table anyways!
To FunkyCatLife: I'm sure your cats love it! Thank you!
Post a Comment