Request for Access to Links

There was a recent update that has caused my Google Doc links to stop working. Please send me a request for access to the files until I can get them up and running again. I will grant you access through the email as soon as I am able to, thank you!

9.26.2012

Fall {Pine Cone Flower} Wreath Tutorial

Happy Fall!  Last year I showed you how I made a burlap bubble wreath for my decorative door, then how to spiffy it up with Fall flowers.  This Fall I really wanted to make a wreath to hang on my front door.  My original plan was to use the leftover pine cones from my Christmas centerpieces and just glue them onto a wreath form.  When I sat down to get started though one idea led to another and I ended up going in a whole new direction.  I could not be more pleased with the results!


I spent around $5 on supplies.   The wreath form was four dollars and I had to stock up on my supply of hot glue, everything else was from my stash...or from my yard...or from my Grandma's yard (she has TONS of the cutest little pine cones). 

The pine cone flowers in the center are quite fun to make and they are sooo easy to paint!  My mind is racing with all of the ways they could be used!


 How to Make a Pine Cone Flower Wreath

Supplies

Small Pine Cones (lots of them)
3 Medium Pine Cones
12" Foam Wreath Form or Larger
Burlap
Hot Glue Gun and Glue Sticks
Small Handheld Pruners
Large (tree limb size) Pruners
Paint:  Yellow, Orange, Vanilla, Brown
A Few Small Branches/Twigs
Ribbon to Hang It
Sprig of Berries
 Clear Acrylic Spray (Optional)

Directions


Starting at the bottom, use the handheld pruners to cut the small pine cones into flat sections. 
This will get VERY messy.  You might even want to cut them outside. 

*Watch your fingers and make sure you keep them out of the way of the pruners.


Use the tip of the pruners to clean up any damaged pieces of the pine cone around the center core.

Wrap burlap around the foam wreath form and hot glue it in the back.

Hot glue the little "flowers" to the burlap, just close enough to each other that they are touching.


Hot glue the sticks and berry sprig to the back side of the wreath. 

Double up a ribbon and loop it around itself at the top of the wreath.


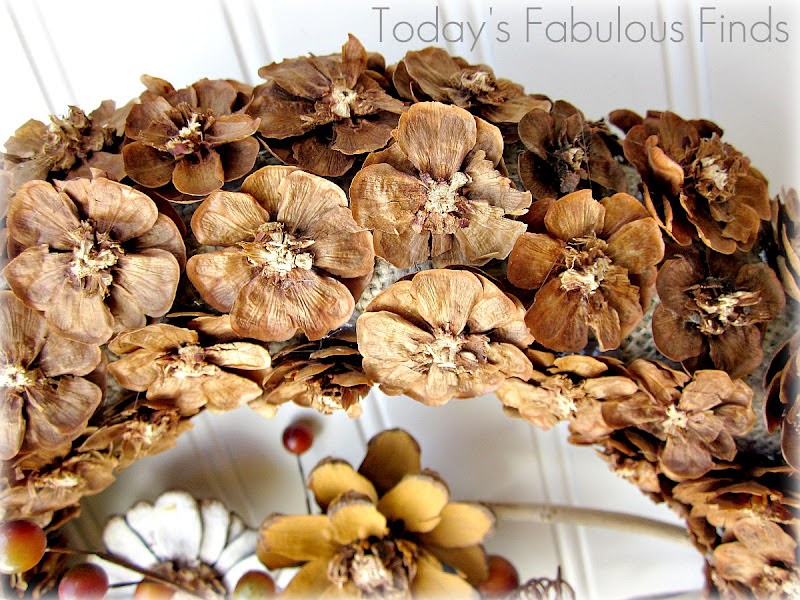
'Candy Corn' Painted Pine Cone Flowers

Use a large set of pruners to cut the larger pine cones into flat sections.  Again, be very careful and make sure your fingers are out of the way, you might want to wear safety glasses too.  I had to quickly open and close the pruners repeatedly to cut through the core of the pine cone.


The flowers are painted in soft 'candy corn' colors with brown paint on the tips of the petals.  You can use any paint you have on hand and layer and mix colors to get just the shade that you want.  I chose not to paint over the dark brown color around the center of the pine cone. 

To weatherproof them, spray them with a clear acrylic spray.

Glue the flowers onto the twigs, using plenty of hot glue.


In December I'll remove the Fall flowers and ribbon and add a red ribbon and Christmas flowers for a whole new look.


So now I have a decision to make:  Do I hang it outside on my unprotected door like I originally planned
(where it will be rained on, tossed to and fro by the wind, and inevitably get covered in dust) or do I find a place for it inside? 


I don't think I could stand to see it get ruined, I love it too much! 

Have you ever made pine cone flowers?  If you haven't, do you think you'd like to give it a try?

If you liked this post and would like to pass the idea along to your blog readers or on Facebook or Pinterest I'd be thrilled!  (Sharing ideas is the reason I blog.)  You are welcome to use one of my pictures with a link back to this post if you'd like.  Thanks!

Today's Fabulous Find...Pine Cone Flowers


Sharing at these fabulous parties!

Fall Party
Pin It!

9.19.2012

Boy's Room Wall Art with Chargers

Nearly every time I shop at Wal-mart I make sure to go check out the clearance section in the home goods section.  Most of the time I don't see anything that I need/want, but a few months ago I felt like I hit the jackpot when I found a stack of 14" solid wood dinner plate chargers for only $2 each!  They were originally priced at $6.96.  Yesterday I felt like making something crafty and ended up turning three chargers into some fun wall art for my son's room for only $6!


I bought ten of them knowing that there are several things that I could make with them.  I have an idea for a Christmas gift and will tell you about it when/if I figure out all of the little details.


Because I might want to use the chargers for something else down the road I didn't want to paint over the wood.  I didn't have enough white vinyl on hand to cut the images out either so I took a chance and used everyday white contact paper, which I had plenty of.  (You can read more about cutting and using contact paper for stenciling here.)  If it starts to peel I'll come back and update this post and let you know--hopefully it won't.


My son picked the images he wanted and chose a tractor, an airplane, and a monster truck.  I found the images online and in Microsoft office, uploaded them into the Silhouette program, and then converted them into images that could be cut with the Silhouette.  If you aren't sure how to do this, there is a great tutorial at Sew Dang Cute Crafts.


This is the dresser in my son's room.  It's amazing how closely the chargers match it!  It's rare that I find something on clearance that doesn't need to be spray painted!

Command strips are my new favorite way to hang pictures and wall art.  These things really work!  I used one strip for each of the chargers which should be enough, but I might still go back and add another one since they are hanging above my son's bed, just to make sure they won't fall on him.


I had so much fun making this wall art, probably because it was so easy to put together and didn't involve making a huge mess! 


Two Years

I also wanted to mention that last Sunday marked two years of sharing my 'fabulous finds' here on this blog, it's crazy!  When I published my first post two years ago, I knew that there were craft blogs and that people commented on them, but I had no idea that these commenters were part of a whole blogging community of women (and a few men) that lift and support each other and inspire each other's creativity.  The blogging community has made the world we live in just a little bit smaller and I can't tell you how much I've enjoyed being a part of it.  Thank you for stopping by to read about my little projects, for your support, and for your friendship!

Today's Fabulous Find...$6 Boys Room Wall Art


Pin It!

9.08.2012

A Dozen Craft, Decor and Recipe Ideas for Fall

Just in case you missed them...


 Fall Mantel and Shelf


I really like these Apple Streusel Cheesecake Bars, they've become a favorite of mine!  They make a delicious fall dessert recipe because you can eat them warm or cold.  Mmm!

We're enjoying beautiful weather this weekend, I hope you are too!

Pin It!

LinkWithin

Related Posts with Thumbnails