3.29.2012

Spring Moss Wreath Tutorial

The other day I saw a Spring Square Wreath that I liked made by Suesan at Frou Frugal.  I wanted to recreate the bird nest and flowers that she accented her wreath with, but found out soon enough that it was going to prove to be a harder task than first thought.  Who knew it could be so hard to find a bird nest in March?  After searching several stores I gave up and decided that if a bird could make a nest, I could certainly give it a try.  I'm telling you though, those birds have some skill, without the help of a glue gun, my nest wouldn't have stood a chance! 


How to Make a Bird Nest (If you are not a bird)

1. Take some [budding] branches from a [Lilac] bush and bend and twist them together into the shape of a nest.  Hot glue a few short pieces on to form the bottom of the nest.

2. Twist some spanish moss into a long piece and form it into a circle. Glue it to the twigs.

3. Insert flower stems between the branches and glue in place.

4. Glue eggs inside the nest.


How to Cover a Wreath with Sheet Moss


1.  One package of sheet moss and one foam wreath.

2.  The wreath I used was a 15" bevel foam wreath (it's flat on the top and bottom).

3.  Measure the depth of the wreath and cut the foam in strips to fit around the outer and inner edge.

4.  Glue the moss strips to the wreath with hot glue.  I left part of the inside top unfinished until the end in case I didn't have enough moss to finish it in one large piece.  Turns out I had enough.

5.  Line up the moss sheet and trim it to fit right next to the adjoining pieces of moss.  Hot glue along the edges and a few spots in the middle and gently press it down.  Keep rotating and moving the moss around the wreath until the foam is completely covered, lining up the curve of the cut with the next part of the wreath.  The seams will disappear if you put the moss close enough together.

6.  As you can see, this is a very messy process and there were only a few scraps leftover.  I barely had enough moss in the package to cover the wreath.


The wreath is hanging from a strip of striped fabric in front of a new mirror I bought for our dining room.  The mirror is large (3 ft. x 4ft) and really helps to make the space feel bigger.   The nest is attached to the wreath with straight pins and the wreath is held against the mirror with blue Fun Tac (for posters). 


My plan is to display the moss wreath year round and either change the accent seasonally or leave it plain.  I don't think it will be the easiest to keep dust free though, so we'll see how long it lasts, hopefully for awhile. 


The total cost of the wreath was $15 with sale prices and was well worth it.   I really love the color and texture that it adds to the room!


Linking up here: 

3.24.2012

Thrifty Spring Mantel

What a beautiful day we're having today!  The windows are open, there's a nice breeze that's not too cold, and the sun is shining--it's wonderful!  It seems like the perfect time to show you how I decorated for Spring.  It's very similar to what I did last year, but with a few changes.  Every item that I used was either remade, made for cheap, something I had, or on sale.  I've linked to the tutorials for each of the items if you'd like to read more about them. 


Rustic stars aren't typically associated with Spring, but when I took them off, the shelf seemed plain so I decided to leave them.  I was also back and forth on whether or not I wanted to paint the ($6) bird cage white and distress it.  I'm leaving it for now, but it will most likely see some paint soon to brighten it up, although I think that it helps to balance the dark color of the candle and stars.  I'm so indecisive on this one. 


Framing a Shelf (Before and After)


My youngest is anxious to decorate for Easter, so I'll be tweaking our Spring mantel again this year and adding a few fun things for Easter this week, then after Easter it will revert back to Spring again for awhile. 


I really hope you're fortunate enough to be enjoying beautiful weather this weekend!  The sunshine and fresh air has moved me to get started on some Spring cleaning, so that's what I'll be working on this week while my kids are home for Spring break.  That and some much needed yard work.  I love it!

Have a nice weekend!


I'm linking up to these fun parties, check them out for some great ideas!

3.21.2012

'S' Is For Spring: Mini Moss Letters

Do you have a candle that needs a little something to make it stand out?  I've got an idea to share with you today, that is not only simple to do, but will only take about 10 minutes or so to put together.

'S' is for Spring~Mini Moss Letter


What You'll Need

Candle
Wrapping Paper
Twill Tape
1/8" Ribbon
Poster Board Remnant
Green Moss
(Can use small pieces)
Clear Tape
Hot Glue


Directions
  • Cut a piece of wrapping paper, wrap it around the candle, and tape it in the back.
  • Cut a piece of 1/8" ribbon or string, loop it to the right height, and tape it to the top of the paper so the twill tape will cover the raw edges and tape.
  • Cut two pieces of twill tape or ribbon, wrap it around the candle and tape it in the back.
  •  Draw or trace around the letter onto a piece of poster board or lightweight cardboard.  Cut around it.  Add hot glue to the back side of the letter and then turn it over and glue it to the moss.  Turn the letter back over and cut around the edges to trim the moss to the edge of the poster board.  Fill in any bare spots with moss.
  • Hang the letter from the ribbon, or tape if necessary.
 

I wish that I had moss that was a brighter green on hand to use and may buy some and make another letter.  Overall I really like the look of it.  A mini moss letter (or a mini moss monogram) on a candle is something that could be used for any holiday really, just think about the possibilities!

I finished putting together my Spring mantel today, so I'll show you how the candle fits in with the rest of the mantel soon.  Hope you're enjoying a nice Spring day with lots of sunshine! :)


 Today's Fabulous Find...
Mini Moss Letters/Monograms


Linking up to:

3.20.2012

Whose Game Is It Anyway? (Group Game)

Okay, I mentioned that we played a wacky (but really fun) game, that six of us on the game committee made up, for the entertainment at our Relief Society Dinner.  I'm going to share the basic idea with you and then if you ever want to play it you can adapt it to fit the occasion.  It could be a lot of fun to play at a family get-together/reunion so keep that in mind as you read through the post.


The name of the game is "Who's Game is it Anyway?"  It's a conglomeration of  a bunch of games all pulled together into one:  "Who's Line is it Anyway? (the title), Jeopardy, Minute To Win It, Pictionary, Family Feud, Monopoly, and The Price Is Right.  It's also loosely based on the board game Cranium.

We set it up for four teams, but you could have as few as two.  The game board has five colors.  Four of the colors each represent a different game and the fifth color is wild.  For example:  Green-Family Fued, Blue-Jeopardy, Pink-Minute To Win It, Yellow-Pictionary, Purple-Wild (choice of which of the four games they want to play).


What you'll need:
  • A host and a 'Barkers Beauty' (to assist the host and present the prizes) who are dressed up funny with big hats, old prom dresses, etc., with made up names.
  • CD with the theme music of the game shows:  Jeopardy, Family Fued, Minute to Win It, and The Price is Right.  I found them all at Amazon MP3.
  • 25 large colored paper squares, 5 each of 5 different colors for the game board
  • Masking or duct tape for the start line
  • 4 Objects to use as markers, like in Monopoly.  For example:  A shoe, an iron, a stuffed animal, a toy, etc.
  • 4 Small White Boards and dry erase markers for Jeopardy
  • 2 Large Chalk boards or 4 large dry erase boards
  • 5 or 6 Brown paper bags with all of the necessary items inside to compete in a Minute To Win It challenge
  • 4 Bells or buzzers for Family Fued
  • 1 or 2 large dice made from a square cardboard box

We discovered a few flaws with the rules, so we took the liberty of making up a few as we went.  It was fun!  We wanted to involve as many people as possible, so the teams competed against each other after every roll of the dice.


How to Play:

Roll the die to see who goes first.

The first team rolls the dice to see how many spaces the teams are playing for.  Let's say that they rolled a five and landed on the color yellow, which is Pictionary.  Each team sends one person up to draw while the other team members try to guess what they are drawing first.  The first team to finish the challenge takes/steals the points.  The winning team moves ahead the 5 spaces and then rolls the dice.  They keep moving forward until someone beats them at a challenge, then that team rolls the dice.

Here is where the game can be adapted.  We focused the questions around the history of the Relief Society, using questions from Daughters In My Kingdom (a book about the history and work of the Relief Society) for Jeopardy (Download the Daughters In My Kingdom Jeopardy questions here.), a survey I found online with church related answers (This survey would be great also.) for Family Fued, and related words for Pictionary.  For a family get-together/reunion, you could use your own family history, or survey family members and use their answers for Family Fued or just search 'family fued game' and there are many free survey results to choose from.  


For the Minute to Win-it challenges, I played the 'blueprint' music, which happened to be just over one minute long.  When a player finished, or the music ended,  the challenge was over.  Some of the challenges were:  stacking 6 dice on the end of a Popsicle stick that you are holding in your mouth, stacking cups, blowing cups off of the table with a balloon, etc.  We didn't have any challenges that would embarrass anyone.

For Family Fued, the first person to buzz in said their answer first, if it was the top answer they automatically took the points.  If not, the other teams gave an answer and the top answer won.  Jeopardy was played the same way.  Each team sent up one person, the answer was read by the host, and the first person to write the question down on their white board correctly and turn it around took the points.  These two games were a little tricky to play with four teams so we had two judges who had the final word.

After the first team crosses the finish line (or when time is up), the top two teams compete against each other in The Price Is Right Showcase Showdown.  The showcases might include:  a washer and dryer set (a washcloth and dish towel), a new car (red Matchbox convertible), $800,000 (package of 8- 100 Grand candy bars), etc.  Be creative with the showcase items.   They bid on the cost of the item if they were to buy it in real life (not from the dollar store).  Follow the rules of the showcase showdown for bidding.

I'm sure that I left some things out, but these directions are already feeling pretty long!  If you have any questions, or if anything doesn't make sense, please ask.  The game takes some set-up time, but it's a fun one to play in a large group if you want to involve everyone and give them a chance to work together.

 Today's Fabulous Find...
The Game Show Music--it Really Made the Game!

3.18.2012

Three Easter Wheat Grass Centerpieces and an Update

On the day of our dinner, I quickly snapped some pictures with a few Easter eggs placed in the wheat grass to show you a few ideas for Easter centerpieces.

This is a piece of the wheat grass that was grown on a paper towel.  The grass in the pictures is taller than I would have preferred it to be to add eggs.  I think that the height after growing the grass for 6 or 7 days would have been a better height. (This was day 11.)


Hindsight, I should have added a wide ribbon around the center of the grass in the milk glass dish to pull it up straight, oh well, next time! :)


This little box is 6" long.  The ends of the box are the tops of the fence slats that were leftover from when I made the large boxes.  I think I want to paint one (of the four small boxes I made) white and distress it for an Easter basket centerpiece with wheat grass and eggs, maybe even add a stencil.


Update

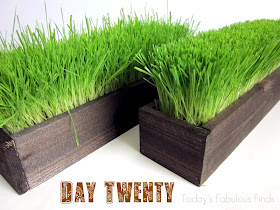
Some of you have wondered how long the grass will last.  This is only the second time that I've grown it, so I can only tell you from my limited experience.  The first grass that I grew looked really bad by day twenty.  It was brown and limp and looked awful.  (I only kept it this long because I kept forgetting to take a picture so I could show you.)


Now I believe that I over-watered it.  Once the wheat grass is established, it really doesn't take very much water to maintain it (depending on your climate and house temperature).  On this second round, at day eighteen, the wheat grass started to look pretty unruly.  You can see the base was turning yellow, it was beginning to fall over at the ends of the box, and the tips of the grass were turning brown.  (I had already trimmed it with scissors multiple times at this point.)  I thought it was a goner again, but decided to trim it up one more time, but shorter than I had been trimming it before, pluck the grass that was sticking out of the sides, and see how it did.


As you can see, it made a big difference!  I think the key might be to keep it trimmed short.  I still don't think that it will last too many more days, guess we'll see! 


Here's a side by side look of the before and after.  I'm keeping track and will add an update to this post to let you know how long I can keep the grass green this time.  The challenge is on!

Update:  Well, the grass varied some on how long it lasted.  From my experience it lasted around 3 weeks, give or take a few days from when I planted it.   At the end of that time it was looking old.  I think because it's so easy to plant and grows so fast, if you want grass for an extended period of time, replant it.  Maybe even stagger it so you constantly have grass that looks nice. 


Are any of you growing wheat grass for Easter this year?  Do you have any fun ideas you're trying for centerpieces?

I just realized that Friday marked 1 1/2 years to the day of when I made this blog public.  It's so hard to believe it's been that long!  Thanks so very much for reading, for supporting me, and for making this such a fun experience! 

Today's Fabulous Finds... Simple Easter (Wheat Grass) Centerpieces 


Linking up to my favorite parties!

3.13.2012

Table Decor on a Dime: Relief Society Dinner

One of our favorite ways to decorate the tables for our Relief Society dinners is with inexpensive runners.  Sometimes we buy colored plastic table cloths from the dollar store and cut them in four lengthwise strips.   This time I found some pretty brown wrapping paper (the color of the burlap runner that I liked) at the dollar store.  I unrolled the paper and used a rotary cutter and mat to cut it straight down the center.  The total cost: $5 (for 9 large tables and 2 small tables).  We put it over white table paper (not sure if that's what it's really called).  The wrapping paper was also used to make stitched envelopes for the invitations.


Keeping with the wheat theme (wheat is on the Relief Society logo and is a part of it's history), I filled mini pails with wheat to give as favors so they could go home and grow wheat grass of their own.  You can find the pails at Dollar Tree in the wedding section.  They were three for a dollar and included the white ribbon--a really good deal!   Each pail held 1/3 cup of wheat.  (You can buy the wheat at Winco in the bulk food bin section.)


The little craft bags are from JoAnns and were $1.50 for 100 bags.  These bags are a great size for favors!  I want to go back and buy more so I can have them on hand to fill with candy, add a printable topper, and then use any time I need a little treat for something.


I made the flowers with a shape from the Silhouette online store.  The three layers of petals are stapled together in the center.  I covered the staple with a circle of green vinyl (cut with my Silhouette).  The flowers are attached to the pail with blue Fun-tac.  Sticky dots would have worked really well too.


Last minute I made up some directions to hand out on how to grow the wheat grass.  If you'd like to print it, I've uploaded it to Google Docs here.  I'm in no way an expert on growing wheat grass, but this might help you get started.


As a little thank you, I filled a few of the buckets with M&M's  for the girls who helped watch the young children during our activity.  I think I'll make up more of them for Easter treats too!


For each of the tables I used Wordle to make up photo cards with each of the ladies names in our Relief Society on them as well as our theme  (Learning and Growing Together), placed them back to back, and then clipped clothespins onto them to stand them up.  This clever idea was found at  Foutch Coutch.


The cake was purchased, leaving us with one less thing to worry about making!


We served Hawaiian Haystacks, fruit kabobs, and of course the chocolate cake.  It was all delicious!  I wanted to take a picture to show you how the color of the food stood out against the colors on the table, but I didn't have the guts to whip out my camera in the middle of dinner and take a picture of my plate, I seriously thought about it though! :)  You can kind of see the bright colors in this picture.  The blank spot on the table was where the crock pots of chicken gravy were placed.


What you see in the background is the set-up for the wacky game that we made up and played called "Whose Game Is It Anyway?".  I might just tell you about that too, it was a hoot!


Here's another look at the wheat grass.  I wanted it to look natural with the daisies and had planned it all out so it would be the perfect height for the dinner (read about the practice run here), then last minute it was necessary to push the date back two days. Wheat grass can grow pretty tall in just 2 days.  With a little trimming though, I managed to keep the growth under control while maintaining a natural look.  Even though it was taller than I imagined it would be, we could still easily see over the top of it and I don't think there's such a thing as too much green.  Am I right?

By growing our own wheat grass, making the planter boxes, and shopping at dollar stores, we were able to reach our goal of creating a space where we felt like we stepped right into Spring for the night.  It was really wonderful!


Are you getting sick of hearing about wheat grass yet?  I've got a couple more ideas to share, so if your over wheat grass, hang in there, I'll be moving on to other things soon. :)


Today's Fabulous Find...Dollar Store Table Decor


Linking up to:  Lil' Luna  Creations By Kara