10.30.2011

Fall/Thanksgiving Mantel

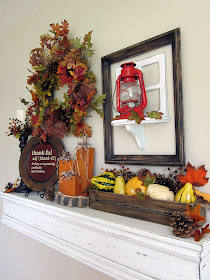
Over the last couple of weeks I've been showing you parts of my new Fall/Thanksgiving mantel, would you like to see how it all came together?   This is the first time I've had a mantel shelf to decorate for Fall, so it was a fun challenge to see what I could up with. 

I saw a tutorial for a box mantel shelf that looked fairly easy to make, so I gave it a try and made one.  I'll tell you more about the shelf in a future post, but just have to tell you that it's a large shelf, I only spent around $10 for supplies (I used several items that I already had.), and it really wasn't hard to make. 


When I saw this wreath at JoAnn's I knew right away it was the wreath for me.  I love the color, the pine cones, the berries, the twigs...all of it.  I used a coupon, so I paid around $20 for it.  I don't think I could have made one for that price.


This is the framed shelf and lantern that I've had there all year.  I love the pop of red, so it won't be going anywhere anytime soon.  The window is made from paint sticks (tutorial here), the frame (.36) and shelf (.75) were both from thrift stores.


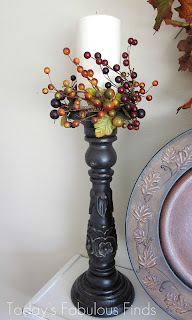
The candlestick was purchased for $1.50 at a thrift store then painted dark brown, the berries were .99 each, and the candle was on clearance for .89.  The berries are taped in place with clear tape--worked great. :)


The charger was on clearance last year for $1.50.  I added the definition of thankful to it in vinyl.  You can read more about the charger here


I've had the 2x4 pumpkins for a few years, but added a slice from a log to group them together.  Click here for the tutorial for the pumpkins and my experience with cutting the log.


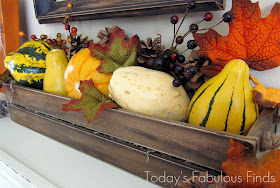
The crate is also made of paint sticks.  I added a $3 bag of gourds, two .99 sprigs of berries, and a few fall leaves.  The pine cones are from my yard.  Click here to read more about the Fall crate and here for a tutorial on how to make a paint stick crate.


I found the tutorial that inspired me to build my shelf at Faded Country.  I made a few changes in size and build design, this one measures 4 ft long and 7 1/2" wide.  I'll have more on the shelf coming soon, including how I hung it.   Edited to add:  Click here for my post about the mantel shelf and how to hang it.


Another look...


...and another...


...last one.


The bright Fall colors really add so much to my living room, so although this is my first time decorating a Fall mantel, I can tell you that it won't be my last.

Today's Fabulous Find...New Mantel Shelf


Linking to:  The DIY Showoff Fall Festival
  Pocket Full of Pink   Just A Girl   Chic on A Shoestring  My Repurposed Life  The Idea Room   House of Hepworths   The 36th Avenue  Beyond the Picket Fence  The Shabby Creek Cottage  Lil' Luna   Creations by Kara   Someday Crafts  Blue Cricket Design  Sew Much Ado  Domestically Speaking  Today's Creative Blog   Home Stories A to Z   Beneath My Heart   I heart Naptime  Dittle Dattle    Under the Table and Dreaming   Embellishing Life Everyday  Somewhat Simple   Making the World Cuter  Skip To My Lou   Funky Junk Interiors, Tator Tots and Jello

Visit thecsiproject.com


These parties are full of fabulous ideas!  Definitely worth taking a look.

10.26.2011

Featuring: Pumpkin Bubble Wreath and a Costume Delimma

April R. recently e-mailed me a picture of the burlap bubble wreath that she just finished.  I think her idea to make it as a pumpkin is so very creative and fun and wanted to pass it on to you.  Thanks for sharing your wreath with us April, it's so cute!


This week has been a busy one.   I'm working like crazy to try to get all my painting projects done before it's too cold to open the windows for ventilation.   I mentioned a while back about the table that was really giving me problems, it's finally done but I haven't been able to write a post about it yet. 

This week I've been working on adding some board and batten in two rooms in my house (with my husbands help), which seemed simple enough until we decided to replace all of the baseboards in our kitchen/dining room, living room, and hall as well (to match the height of the board and batten baseboard).  Because I painted the board and batten a different color than my trim (it's the same color as my kitchen cabinets that I painted last year), if I want everything to match, I'll need to paint all of the window trim and doors as well---all of this the week before Halloween!  Am I crazy?!  I think I might be, lol! 

Two out of four of my kids have their costumes ready to go for Monday.  I'm confident I can buy one of the costumes, but my daughter wants to be this little character for Halloween:

It's Sack Boy from a video game called 'Little Big Planet' one of my kids very favorite games.
Um...can we say complicated?  I'm really not sure how this is going to happen, lol!  How would I make it?   Dye sweaters from Goodwill maybe?  And how would you make that head?   With my house torn apart,  I'm not really in a great position to start on a sewing project, so I asked her what her second choice would be:


A princess Leia costume would be so much easier to whip up for sure (I might even be able to find one to buy), but it's not what she really wants to be.

Are you sewing costumes this Halloween for yourself or for your kids?   Do your kids get to pick whatever they want to dress up as, or do you 'guide' them in their choices? 

Today's Fabulous Find...Pumpkin Bubble Wreath


10.24.2011

Fall {Paint Stick} Crate

This last spring I wanted a narrow crate that I could set on my shelf, so I made one out of paint sticks, which worked so well.   I recently updated it for Fall and it was so easy to put together.


I left the spanish moss in the bottom of the crate to use as a filler, then added a $3 package of gourds from the grocery store (I picked through the bags until I found one with the colors and shapes that I wanted).  The pine cones were free:  I'm so lucky to have my very own 'pine cone factory' right in my back yard with my own free labor too. ;)  My four year old picked the pine cones up for me the last time I mowed the lawn and put them in a bucket for me.   I used them in another place too, but I have one more thing I want to do before I show it to you.


I also added a couple of sprigs of berries from JoAnns that were on sale for .99 each.  They match the berries that I added to my Fall bubble burlap wreath.  


This was quick and easy to put together and would look great on a shelf or as a centerpiece on a table too. 


The total cost to update the crate was $5 plus the cost of the leaves that I sprinkled around.   It's been great to be able to use the crate as my base and then fill it for different seasons, it's saved time, space, and money. 

There's just one more thing to show you before I post about how it all came together, my new 'mantel', which really was such a great find! :) 

Today's Fabulous Find...Decorating with [Free] Pine cones


10.21.2011

Shabby Apple Dress Giveaway {Now Closed}

Giveaway is now closed, thanks for entering!

Recently I was contacted by a representative from Shabby Apple and offered an opportunity to give away one of their fabulous dresses to one of you fabulous ladies.  Before I show you the dress that could soon be hanging in your closet, I want to show you some of the items you can find at Shabby Apple.
 
'Cider' from Shabby Apples' The Berkshires Collection.
 Amazing color!

Shabby Apples' Black Collection


Did you know that Shabby Apple has a maternity line?
I think this dress looks so comfortable.


This adorable little girls dress is called the Hibiscus.
"An Addi & Kinsi creation, the floral print lies on a bright blue background making the off-white flowers with leafy green detail stand out. Brown band gives this dress a mature, yet girly look. Skirt hits at the knee for full coverage and comfort." -Shabby Apple

  
Ready to see which dress you are entering to win?
Shabby Apples Da Vinci Dress
 (valued at $56)


I really like the basic color and style of the Da Vinci.  
With it's drop waist and jersey knit fabric, I think it would fit comfortably on different body types as well. 

About the Dress
"Sometimes choosing an outfit is as complex as cracking a Da Vinci anagram or reading backwards italian cursive without a mirror (or a dictionary!) Take the guesswork out of dressing with the soft and simple Da Vinci dress. One part sweatshirt, one part puff-sleeved perfection, this easy-wearing number has a flare for the informal with its drop waist, A-line skirt and kangaroo pockets. Pack it for your next weekend getaway or make it a part of your everyday routine." -Shabby Apple

10% off Coupon

Shabby Apple is also offering you a 10% off coupon, good for the next 30 days, when you use the code "fabfinds10off".
  
The details: 
  • Giveaway ends on Monday, October 31st, 10 pm MST. 
  • Winner must have a United States shipping address. 
  • No exchanges can be made for the winning dress. 
  • You must e-mail me by the deadline or leave your e-mail address either in your comment or have it visible in your Blogger profile so that I can contact you if you win. 
  • Winner will have until November 2nd at 10 pm MST to contact me or I will pick a new winner.
To Enter the Giveaway: 
1st Entry:  Go visit Shabby Apple, take a look around and then come back and leave a comment telling me which dress you would love to hang in your closet.  Super easy right?
2nd Entry:  If you follow or subscribe to Today's Fabulous Finds, leave a comment saying you do.

Good luck!


*I have not received any compensation from Shabby Apple for writing this post.  All opinions are my own.


10.20.2011

Seven Fun Halloween Ideas for Kids

Last year I worked on some fun Halloween projects with/for my kids.  I've gathered them all here together in one post in case you might be looking for some ideas to use at home or for an upcoming Halloween carnival or classroom party.


*A quick reminder:  If you're planning to do the countdown with your kids, it starts tomorrow on the 21st.

Hope this helps you with your Halloween planning. :)  


10.19.2011

Boo! Halloween Blocks {Printable Letters}

I'm back with another guest post to share with you today.  Thanks to all of you who came to check out my Boo! Halloween Blocks over at Rhinestone Beagle's Howl-oween Tricks and Treats Craftathon!   The craftathon is going on all month if you're looking for some fun ideas for Halloween.


Today I'm going to show you how to make these fun little Boo! Halloween Blocks.  They are small in size and all together only measure 3"x 6".  This is a great size for small spaces like a window sill or a book case, although you could make a larger set and use 2x4's too.

Boo!Halloween Blocks
Supplies Needed
10 to 10 1/2" length of 1 1/2" wide primed mdf (Buy a 1 1/2" x 6' board.)
Miter Box and Hand Saw (if you don't have a power saw)
Sandpaper
Black Paint
Foam Paint Brush
Mod Podge
Scrapbook Paper
Distress Ink (black walnut)
Vinyl, photo copy of printable, or black and white paper to trace the letter pattern
Black Plastic Spider and Artificial Spider Web

Directions
  1. Cut two pieces of mdf 3" long.  Cut 2 pieces of mdf 2" long. 
  2. Sand any rough edges.
  3. Paint the blocks black, let dry, and sand edges and corners to distress, letting the white through.
  4. Cut out pieces of scrapbook paper slightly smaller than the blocks.  Run the distress ink around the edge of the paper.
  5. Brush Mod Podge onto the painted block and then smooth the paper on.  Let dry.  Brush Mod Podge over the top of the paper.  Let dry.
  6. Apply the lettering.  There are several ways you can do this.  *Trace around the letters onto black and white paper, cut around, and Mod Podge onto the blocks.  *Cut them in vinyl.  *Print the printable pattern at a photo center, cut out the letters and Mod Podge them on.  (It's necessary to have it printed professionally so the ink doesn't smear when you apply the Mod Podge.)  *Print the traceable pattern on your home computer and then copy that print onto heavy paper using a copy machine.  Cut around the letters and Mod Podge them onto the blocks.  (It's necessary to copy it so the ink won't smear when you apply the Mod Podge.)
  7. Hot glue the blocks together to give them some stability.  (Optional)
  8. String artificial spider web over the blocks and add a little black spider.
Letter Patterns
  • Click on the image to bring it to full resolution before saving it to your computer.
  • The black box around the letters should measure 4" x 6" when printed for the letters to print at the correct size.
 What was that!?
Who cut the lightsWho's there?!

 Happy Howl-oween! 

Rhinestone Beagle


Today's Fabulous Find:  Boo!  Halloween Blocks


Visit thecsiproject.com

10.17.2011

{Spooky} 2x4 Pumpkins

On October 8th I guest posted at Pocket Full of Pinks' Monster Craft Bash and showed how to make these 2x4 pumpkins.  They're also part of my new Fall 'Mantel'.   Notice the shelf is black in this photo and white in the charger photo?  More on that coming up. :)  Here's the post in case you missed it. 


Two years ago I was inspired by some pumpkins at It's A Daisy Day (a private blog now) and made the 2x4 pumpkins pictured below.  I've set them out for two Fall seasons now, so this year I made just a couple of small changes to make them feel new to me again. 


Before I get into the changes, this is how you make the 2x4 pumpkins...

Start with a 2x4 cut to 3 1/2", 6", and 8 1/2" tall. 

Directions:
1. Paint the 2x4 blocks. (I used Pumpkin Orange, a darker orange would look nice.)
2. Sand all edges.
3. Apply a brown wash with a rag or sponge brush by brushing it on and then wiping the excess off with a dry rag or paper towel.  (To make a brown wash add a squirt of dark brown paint to about 1/2 cup of water.)
4. Cut off 3 pieces of a dry branch for the stems. (Large pruners work great for this.)
5. Put a very large dab of hot glue right where you want the stem and then push the stem down into it.
6. Cut a piece of wire then curl the ends by wrapping the wire around a screwdriver or pencil. Wrap it around the stem to hold it in place.
7. Glue moss around the base of the stem.  Tie a raffia and ribbon bow then glue them on.


...so simple...now onto the changes...

The first thing I did was to darken the pumpkins by rubbing on some Valspar Antiquing Glaze (in the color Asphaltum) with a rag...a little change that made a huge difference! 

Then I remembered an idea (from a wedding photo) where a 1 1/2" to 2" slice from a log was used to group the items used for a table centerpiece.  I instantly loved the idea and thought, "wouldn't it be so fun to cut a slice from a log for my pumpkins?"  How hard could it be, right?  Well...I hurried out to the wood stack to find the perfect log to cut for my project.  When I got there I realized that they were all previously split for burning, drats.   I wasn't willing to give up the idea though, so I chose a larger (split) log with interesting bark, grabbed my hand saw (with a small, dull blade) and eagerly got to work.  I have to tell you, it was more work than I anticipated, as you can imagine cutting through this by hand.  As I cut, the log basically fell apart into pieces, ugh.  I was pretty sure that it could be put back together with wood glue, so I kept at it until I finally made it all of the way through the log.   My advice for you...cut the log with a power saw, or use a good hand saw!


In the end, it was well worth the effort. :)  A slice from a log is a fun way to bring the outdoors in and now that my sore muscles have fully recovered, I can honestly say that I didn't pay a thing for it. ;) 


Now...lets say that you want to temporarily change the pumpkins up a bit for Halloween.  Just add a little creepy crawler spider and some artificial webbing and you've got yourself a spooky little pumpkin patch.


Check out Karen's Monster Craft Bash, all through October, for some fun Halloween craft ideas and giveaways!


PocketFullofPink
Today's Fabulous Find...Spooky 2x4 Pumpkins


I'm entering the CSI Projects Halloween Challenge.

Visit thecsiproject.com