4.11.2011

(Simple) Caramel Brownies

Today's fabulous find came from my sister who got it from her sister-in-law who got it from her sister who got it from a free recipe flyer at a grocery store...whew!  You know what that means? ...It's a good recipe...and it's not copyrighted!   I'm SO glad I can share it with you because I find these brownies to be fabulous and think you will too.  In fact, I may have been 'finding them fabulous' all day today!  ; )


Can you see the yummy caramel?  There's chocolate chips in there too!
 
Caramel Brownies

2 Devils food german chocolate cake mixes (update:  there was a mix-up when I wrote down the recipe, it really called for german chocolate cake mixes)
1 can evaporated milk
2 sticks (1 C total) margarine or butter
1 12-14 oz bag of caramels
1 bag chocolate chips
1.  Take bag of caramels and 1/3 C of evaporated milk, combine on low heat and stir until melted.
2.  Mix 2 cake mixes, 1 cup melted margarine, and 2/3 C evaporated milk and mix until the dough  holds together.  Press 1/2 of the dough in a large cookie sheet and bake at 350 degrees for 6 minutes.
3.  Remove from the oven and sprinkle with 1 bag of chocolate chips.  Pour melted caramel over the chips.
4.  Crumble leftover dough on the caramel. (You can gently pat it down some if you want.)  Bake 15-18 minutes.  Eat warm, chilled (great for summer), or chill in the fridge for 1/2 hour before eating.


Today's Fabulous Find...Caramel Brownies...Mmm!
 
One more thing:  I had an unexpected surprise today...
 
Last week Fireflies and Jellybeans announced a contest to design a new logo for The Iron Crafter Challenge on their blog.  I went ahead and made a few buttons to enter (it was so much more fun than cleaning) and it was announced today that my logo made the top three!  Fun, right?  
 
If you have a minute, click on over to Fireflies and Jellybeans (if you'd like to see my designs) and vote for your favorite, even if it's not mine. :) 

Pin It!

4.09.2011

Thrifty Spring Decor

Over the last couple of months I've been showing you pieces of my spring decor.  I thought you might like to see how it all came together.  Many of the pieces were either on sale, thrift finds, from the dollar store, or something that I already had. My total cost--$40!


  Click on the links for more details, including before pictures, costs, and tutorials.


Candle Stick (no link)
$2 Good Will find, spray painted dark brown and distressed.  In the picture there is wire wrapped around the candle.   The wire seemed like a good idea at the time, but blended in with the wreath so I've taken it off.  I might try wrapping wire around another candle sometime though. 
 
 
Dollar store plate and stand.  Total cost (including the vinyl) $3.

Spring Wreath
$9 Wreath (with coupon) and dollar store flowers.  Total cost: $12


(Paint Stick) Crate
Made with paint sticks for under $4.  Greenery was $10 total (buy one, get one free).

Bird's Nest
Thrift store silver dish, dollar store nest, and clearance bird, total cost:  $3.50.  I wrapped burlap around the books to cover the shiny gold titles.  There's a trend (which I like) to rip the covers off of the books, but since they are books that I read, I'm gonna leave the covers alone.


The shelf was a .75 thrift store find that I painted white.
I already had the frame and the lantern.

Made with paint sticks, trim I had, and glass from a dollar store frame.  Total cost: $1
 
 $2.50 Garage sale find that I painted.


I'm already making some fun changes to it for Easter and can't wait to show you!

Todays Fabulous Find...Thrifty Spring Decor


Linking to:
Under the Table and Dreaming
Pin It!

4.05.2011

Easter Subway Art Prints

For my very first Easter subway art print, I decided to use words that I feel best describe why my family and I celebrate Easter and hope that the words will have meaning for you and yours as well.  Next year I'd like to make a second Easter design with fun words like Easter Bunny, eggs, jelly beans, etc...that is unless I find some crazy ambition to make it before then. ;)  If you don't celebrate Easter, I hope you'll enjoy my Spring subway art prints during the month of April...possibly May too. :)


I know I say this every month, but with each new design it seems to get harder to narrow down the options!  There are so many great colors and digital papers to choose from that it can be overwhelming!  I tried to come up with a nice variety for you.  Keep in mind that if you see a design that you like, but the colors aren't the colors for you, they can be changed.


*For even more color and digital paper choices, read through my tutorial on
 
How to recolor a subway art image.
(You can see examples of some of the images that I recolored in the prints above.)


For Personal Use Only


*If you'd like to feature my subway art (I'd love it if you did!), I ask that you please not post the prints themselves on your blog.  It takes me a long time to design them and I like to keep them here. :)  You are welcome to use the pictures and the water-marked image posted above. 
 
The digital papers that I used were offered for free online.  I don't know the original sources, so thanks to all of you who offer them for free for all of us to enjoy!  The images are from Microsoft clip art.


The black and white prints can be printed onto colored paper or scrapbook paper.  They are also the best prints to recolor.  Because it's so easy to recolor them into solid colors (and there are so many colors to choose from) I only posted a few designs this time without added borders.


To download: You must first click on the image to open it in a new window in it's highest resolution.  Right click on the image and either copy and paste it into a document (to size and then print), or click on save image as to save it to your computer.  You will need to size it before you print.
To size the prints:   The prints look will look the best printed as an 8x10 or 4"x5" (for a card), but can be stretched to other sizes if you insert them into a document using a program like Microsoft Word/Publisher or Photo shop.  Insert the image, click on it, then drag the sides of the image to the size that you want.  (A 5x7 will look a bit stretched with this design.) 
You can print them on white or colored card stock, scrapbook paper, or (for the best quality) on photo paper.  (Check your dollar store for photo paper, I found a package of 8- 8x10 sheets for $1.)
 
 
Today's Fabulous Find...Easter Subway Art Prints


Linking up here:
You can browse through the parties by their buttons by clicking on 'Parties I link to' on my menu bar.

Mom of 6  I Love Naptime    Today's Creative Blog    Ladybug Blessings
Someday Crafts Easter Party     Finding Fabulous     Tatortots and Jello     Under The Table And Dreaming


Tip Junkie handmade projects
Pin It!

4.01.2011

March Features

Wow, March is gone!  I can't say that I'm sad to say goodbye though.  I find myself wishing away the gloomy March weather, hoping for brighter days in April.  This is a picture that I took last May of my poor little Daffodils (no fooling).  I really hope I don't see snow this May, I don't think I could take it!
Each month I link to the home pages of the fabulous blogs that featured my projects as a small way of saying thank you.  There are some really great blogs listed here, if you've got some time, I'm sure they'd love a visit!

Spring Subway Art
Under The Table and Dreaming
24/7 Moms
Embellishing Life
Live By The Sun, Luv By The Moon
Thrifty Decor Mom

St. Patrick's Day Subway Art
24/7 Moms
Chic On A Shoestring Decorating
Dollar Store Crafts
Itsy Bitsy Paper
The Wedding Bistro at Bellenza
Scrap Me Baby
Thrifty Decor Mom

Picture Frame to Faux Window
Make And Takes Spotlight

Paint Stick Glass Paned Window
Creations By Kara
My Backyard Eden
Thrifty Decorating
Embellishing Life
Today's Top 20
Simply Southern

Paint Stick Crate
Funky Junk Interiors
Shanty 2 Chic
Serenity Now
Someday Crafts
Designer Garden
Embellishing Life
Reduce, Reuse, Upcycle

Winds and Sails Print
Auntie Lolo Crafts

If you featured one of my projects and I missed you,
please send me an e-mail so I can link back to you!
 

Thanks to all of you who have left me such super nice comments!  There have been times when someone will say something so sweet or ask me a question and I want to reply back, but when the comment comes into my e-mail it says no-reply.  I'm not able to reply back to a comment via e-mail if the person commenting has chosen not to add their e-mail address to their Google profile.  If you have a question and don't hear back from me, check the comments in the post, I'll try to answer your question there. 

Have a great (April Fools) day!

Pin It!

3.30.2011

Denim Bag/Purse from Girls Jeans

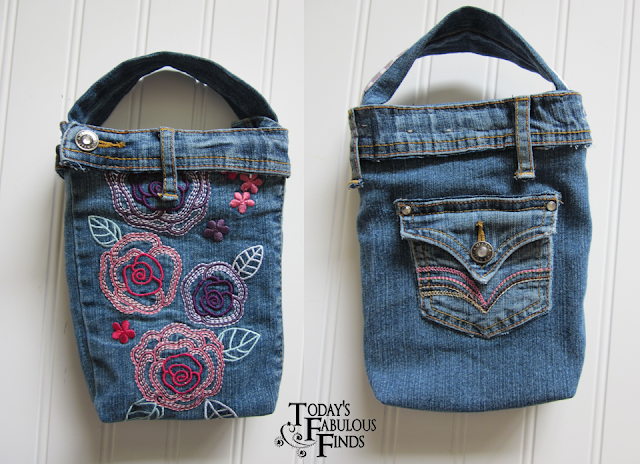
Last weekend my daughter and I made an embroidered denim scripture bag from flare jeans that she has outgrown.  The flowers were already embroidered on the bottom of the jean leg, so I just cut the bottom of the jean leg off, turned it upside down, stitched across the bottom and voila...an instant bag!  Then, of course, we added a few more things to make it fun. :)


Directions:

Cut the bottom of the jeans off at the height that you want your bag.  Add extra for a flap at the top and for the seam at the bottom of the bag.  (Since my daughter is using this bag for her scriptures, we put them inside the jeans to measure how tall the bag needed to be.)


To sew a pocket on:   Cut the pocket out of the jeans by cutting right along the outside edge and through both layers of denim.  Pin it onto the bag and then stitch right next to the outside edge of the pocket, then stitch again about 1/4 inch in from the first stitching.  If you match the thread color to the denim, you won't even notice the stitching lines.

To stitch the bottom of the bag, turn the pant leg inside out and then upside down.  Stitch across the unhemmed edge and then stitch across each corner to make the bottom of the bag.

 
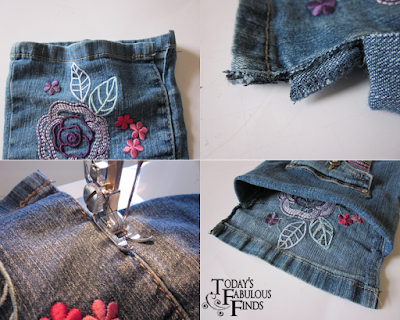
To make a flap, cut the bag down on each side (right next to the side seam of the jeans), fold the front down and stitch the sides to hold it in place.  I made this one so that the flap closes on the inside of the bag (she really wanted a flap to close).  If you don't add the belt loop, you could close the flap to the outside of the bag.  Stitch on a piece of velcro or add a snap to the flap to keep it closed.
 
 
To add a belt loop (pen pocket), cut the top of the jeans off next to the stitching, cutting around the bottoms of the belt loops as you go.  (Don't unpick the thread, just cut up close to the stitching on the belt loop.)  Pin the top of the jeans around the top of the bag and then stitch it at the top and the bottom.  Cut, then fold the end of the waistband under and stitch it at the end.  (This makes a little pocket that is just the perfect size for a pen.)  Stitch the belt loops to the bag. 
 
To add a handle, cut up the side of the pant leg (against the stretch of the jean) so their is a seam on one side.  Open it up and fold the two sides in so the cut edges are in the center and the seam is on the bottom in the center.  Sew a piece of ribbon on top, over the cut edges, along each side of the ribbon.  (This will enclose the raw edges.)   Turn the end of the handle in, that isn't already hemmed, and stitch it to the inside of the bag.  Stitch the hemmed side to the other side of the bag.  You're done!
 
 
I pushed the bottom of the bag up to show you how it would look as a purse.  For a purse I would make two handles instead of one.  Bright colored wide ribbon or a scarf for the handles would be so pretty, don't you think?
 
 
I also made a scripture bag for my son that is similar, but with the flap on the outside and the handle on the side.  He picked out the fabric all by himself, can you tell?  ;) 
 
Today's Fabulous Find...Making a Denim Bag from Girls Jeans
 
 
Pin It!

LinkWithin

Related Posts with Thumbnails