Recently I was given the wonderful opportunity to guest post at Under The Table and Dreaming for Handmade Holidays (featuring STYROFOAM™ Brand Foam), which was really such a huge thrill for me. Stephanie Lynn's blog is one of the first blogs that I started reading and has always been a favorite of mine and a source of inspiration. This is the post that I shared.
Imagine a world with marshmallow trees and whipped cream days. A place where the sun shines so your nose won't freeze, and marshmallow clouds are being friendly. Doesn't that sound so fun! These images come from the song
'It's a Marshmallow World', which was the inspiration
in creating a whimsical marshmallow wonderland for my kids that will keep them dreaming all Winter long.
In our marshmallow world there is a tree made of white fluffy 'marshmallows' with polka dots that look strangely similar to the berries in a certain crunchy holiday cereal we enjoy!
Our wonderland has a tree that is made up entirely of 'mints', a tree topped with yummy whipped cream, and a 'fur' tree that is softer than any fir tree
we've ever known!
Our marshmallow world is a magical place full of wonder and fun and I'm so excited to be here today to show you how you can make one of your own. If you're not a sewer, don't worry, you will only need some hot glue and a whole lot of straight pins!
For all Five Trees
Cut a tree branch in varying lengths for the trunks of the trees. It's best to use a saw, but large pruning shears will work okay. For the tree bases, cut a small log into varying sizes. Hot glue the branch to the log (use plenty of glue) and then glue moss around the base of the trunks.
Tree #1: 'Fur' Tree
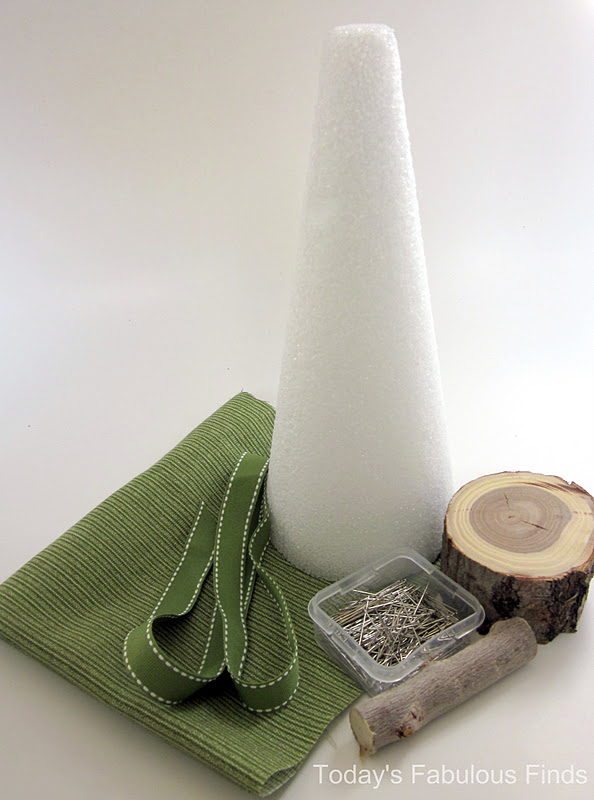
Supplies Needed:
1. Wrap the fur around the cone of
STYROFOAM™ Brand Foam on a diagonal and pull the fabric together tightly.
2. Pin along the side, then cut the fur next to the pins.
3. Fold the fabric on the end up to the base. Cut the fur to fit the base.
4. Pull the fur together on the side, overlapping it slightly, and pin it in place. Trim if needed.
5. Trim the fur at the top of the cone of
STYROFOAM™ Brand Foam (if necessary) and pin in place.
6. Cut a small hole in the circle of fur at the base large enough to fit the diameter of the branch for the trunk.
7. Fold the fur under at the edges and pin it in place at the base.
8. Wrap the ribbon around the tree on a diagonal. Pin at the top and the bottom. Cut the ends of the ribbon on a diagonal to reduce the risk of fraying.
9. Hot glue the tree to it's base.
Tree #2- 'Peppermint' Tree
Supplies Needed
1. Wrap the fur around the cone of
STYROFOAM™ Brand Foam on a diagonal, overlapping the fabric.
2. Fold the fabric on the tree top under and pin in place by sticking the pin straight in to the cone of
STYROFOAM™ Brand Foam.
4. Fold and pleat the fabric at the tree base, pin in place.
5. Trim the extra fabric, leaving an opening that is the size of the branch for the trunk.
6. Hot glue the tree to it's base and pin the fabric close to the cone of
STYROFOAM™ Brand Foam.
7. Pin a ribbon(s) around the top and around the base of the tree. The finished tree pictured in the vignette has on ribbon over top of another.
Tree #3-(No Sew) 'Whipped Cream' Tree
Supplies Needed
One 6" x 3" Cone of STYROFOAM™ Brand Foam
2 1/2" Strip of 45" wide fabric in white and one 4" white fabric square
2 1/2" Strip of 45" wide fabric in green (or another accent color)
Extra Long Satin Pins
1. For the Ruffles: Of the green fabric, cut two 2 1/2" x 11" strips, one 2 1/2" x 10" strip, and one 2 1/2 x 9" strip. Of the white fabric, cut one 2 1/2" x 11" strip, two 2 1/2" x 10" strip, and a square 4" x 4" piece for the top.
2. The order of the ruffles starting from the bottom is: 11" green, 11" white, 11" green, 10" white, 10" green, 10" white, 9" green, and white 4x4 square on the top.
3. Fold the fabric strips in half. Wrap the bottom strip around the bottom of the cone of STYROFOAM™ Brand Foam overlapping the edges. Pin it.
4. Pin the fabric strip on the opposite side, then again in the middle of the other sides and then once more to gather the ruffle.
5. Make a 'bubble' of white fabric (steps shown below), pin it to the top of the tree. Tuck any raw edges under and pin it so the bubble of fabric hides the pins.
6. Glue the tree to it's base.
Tree #4-'Marshmallow/Bubble' Tree
Supplies Needed
One 12" x 4" Cone of STYROFOAM™ Brand Foam
One package of sixteen 1" Balls of STYROFOAM™ Brand Foam
3/4 yd of 58" wide heavy weight white fabric (The tree pictured is made of white stretch taffeta.)
Paint
Extra Long Satin Pins
(This tree was inspired by my Burlap Bubble Wreath. I thought it would be fun to try the bubble on another shape.)
A pin is used in the pictures to show where you will hold the fabric with your thumb and index finger when folding it. You don't need to pin it until step five.
1. Cut six 4" strips that are 58" long and then cut each strip into 4" squares.
2. Fold the square in half to form a triangle. Take the right hand corner (pinch one layer of the fabric on the very tip) and bring it to the front. Line up the corners.
3. Take the left hand corner (pinch one layer of fabric on the very tip) and take it to the back. Line up the corners.
4. All four corners should be lined up at the bottom. Puff out the center, it should be in a bubble shape now.
5. Pin through all four layers of fabric.
6. Pin the 'bubbles' to the cone of STYROFOAM™ Brand Foam. Pin one bubble on and then place the next one close to it so that it hides the pin on the one that you just added. The bubbles should be just close enough so that you don't see any of the cone of STYROFOAM™ Brand Foam or the pins.
Polka-Dots/Berries (To add a little whimsy.)
Push a pin through the center of each of the sixteen 1" balls of STYROFOAM™ Brand Foam. Hold onto the pin to paint them. Let fully dry. Push the pin in between the bubbles on the tree.
Tree# 5- 'Mint' or 'Jelly Bean' Tree
Supplies Needed
1. Glue the beans on in rows one at a time with hot glue until the tree is completely covered.
2. Pick off any strands of hot glue, then spray paint it with off-white spray paint.
3. Glue the tree-top onto the trunk and base and pin a ribbon bow to the top.
Subway Art Sign
Supplies
One 12"x18" Board of STYROFOAM™ Brand Foam
Four 1/4" x 3" x 24" Poplar Boards (They actually measure 2 1/2 inches wide, not a full 3" and can be found at Lowes.)
Four large 5 gallon size paint sticks. You can buy them at some paint counters. (You could also use ribbon instead.)
Dark Walnut Stain
Off-white Paint (Sherwinn Williams Alabaster was used for this sign.)
Sand paper
Hot glue gun and hot glue
Black spray paint or craft paint
1. Spray paint the front of the 12" x 18" board of STYROFOAM™ Brand Foam. Be careful to keep the coats light. If you spray too heavily in one place it can damage it. (This step is only necessary if the white color will show through between the wood slats, you could also use craft paint.)
2. Cut the 1/4" x 3" x 24" poplar boards in half. Measure first before you cut. You may need to trim them down some so the will fit. Cut the paint sticks to fit around the board of STYROFOAM™ Brand Foam.
3. Use a rag to stain the 4 paint sticks and the poplar boards with dark walnut stain. Let fully dry.
4. I used a vinyl cutting machine and contact paper to make a stencil for the subway art. The font used is called Latha. Another option is to print out the words you want to use and cut out a stencil with an exacto knife. You could also print the subway art words on your home computer, take it to a copy center and copy it (prevents the Mod Podge from smearing the print), then trim to size and Mod Podge onto the boards.
5. If you are using a vinyl cutting machine: Cut out the subway art words onto contact paper. Weed out the background. Apply the lettering to the boards and paint over it. It may take 2 coats. While the paint is slightly dry yet still tacky, pull up the contact paper with some tweezers. Let dry and then sand to distress, sand all edges and lightly over the top of the stencil.
6. Glue the paint sticks around the perimeter of the board of STYROFOAM™ Brand Foam. Glue each board slat into place with a dot of hot glue on each side.
*I'm planning to buy more boards to put on the back of the subway art to make it reversible. I'll use words that are not seasonal so the board can be used year round.
This vignette took some time to put together, but wasn't difficult to make. It was nice to be able to use pins with the
STYROFOAM™ Brand Foam. If something didn't look quite right, I simply pulled out the pin and tried again. Also, if I ever want to dream up a new look for the trees, I can easily unpin the fabric and recover them with something fun and new!
This was a lot of fun to put together and has now given me a reason to look forward to the month of January. :)
Edited to Add: If you'd like to see my full Marshmallow Wonderland Mantel and My Christmas Mantel,
click here.
Linking to:
Beneath My Heart Creations by Kara Tator Tots and Jello Funky Junk Interiors Creation Corner Someday Crafts Domestically Speaking Blue Cricket Design Today's Creative Blog Home Stories A to Z
Disclosure of Material Connection: I received one or more of the products or services mentioned in this post for free in the hope that I would mention it. Regardless, I only recommend products or services I use personally and believe my readers will enjoy. I am disclosing this in accordance with the Federal Trade Commission’s 16 CFR, Part 255: “Guides Concerning the Use of Endorsements and Testimonials in Advertising.”