Showing posts with label sewing. Show all posts

4.26.2012

Ladies Sundress to Girls Smocked Jumper (Tutorial)

If you're looking for a girls dress, sometimes it pays off to shop in the women's section.  I bought a sundress (women's one size fits all) for $6 at Ross, added some straps, and in only minutes turned it into a girls smocked jumper--perfect for Hawaiian day at school!


 I think that a lot of times the most difficult part of altering clothing is matching the fabric, do you agree?  I really lucked out this time and found a piece of fabric with a near perfect match in a remnant bin. 


How to Add Straps to a Sundress

1.  Measure for the length of the straps by first putting the dress on whoever will be wearing it (if possible). 

2.  Measure the length from the front to the back of the sundress over the shoulder and add 1" to that length to allow for 1/2" seam allowances.  Measure the distance from the side seams to where the straps need to be to allow enough room for the arm.

3.  Decide how wide you want the strap.  Multiply that number by two and add 1" for seam allowances.

4.  Cut two strips of fabric using your measurements, fold them in half lengthwise (right sides together).  Stitch along the length of the straps using  1/2" seam allowances.  Turn the fabric right sides out and press.  Finish the raw edges with a serger or a zig-zag stitch.

5.  Line up the ends of the straps, measuring from the sideseams of the dress and 1/2 inch down from the top of the dress and pin in place.  Use matching thread and stitch along one of smocking lines to hide the stitch. 


The first time I sewed on the straps (at 11pm the night before Hawaiian day when my daughter was asleep) I forgot to measure the distance the straps should be sewn in from the sides so I guessed.  She put it on the next morning and could barely get her arms in!  Well I sure guessed wrong!  I had 10 minutes to scramble to unpick the seams and resew them before she had to catch the bus, sheesh, when will I ever learn to not put these things off?  Please tell me that I'm not the only one that does this. :)


Today's Fabulous Find...
Turning A Ladies Sundress into a Girls Jumper 



Pin It!

1.20.2012

Girls Barbie/Valentine Fleece Scarf {Tutorial}

Hey everyone!  So can you believe that we're already sharing Valentine's Day projects?  Time's a flyin'! 

I made eight of these fleece scarves for my daughter's Barbie themed birthday party (for just over $1 each), but don't you think they would also be pretty fun to wear on Valentine's Day?   They're pretty simple to make too, just four stitching lines (two of them are even straight). ;)  


Supplies

The stretch of the fleece will need to go across the width of the scarf, not the length, so the scarf doesn't stretch out really long when it's being used.  This means you will need to buy enough fleece for the length of the scarf.  54" was a good length for a girls size scarf.
  • 1 1/2 yds. of pink fleece and 1/4 yd of white fleece (This is enough to make eight scarves.)
  • 3/8" Ribbon (The polka-dot ribbon is from Wal-mart.) 
  • Black Thread
  • Black Felt (2-3 sheets for eight scarves), Assorted Gems, Hot Glue, and Safety Pins.  (optional)
*I bought the inexpensive, thin fleece from Wal-mart for $2.88 a yard.  It worked really well for this project.  I spent around $5.50 on enough fabric to make 8 scarves.


Directions
(Sewing time is about 15 minutes for each scarf.)

1.  Cut off the selvage edges.  Cut the pink fleece 7" wide, using the length of the fleece (54") for the length of the scarf.  The stretch needs to go across the width of the scarf, not the length, so the scarf doesn't stretch out when worn.  I have a rotary cutter, ruler, and mat that I use to get a nice clean straight edge. 

2.  Cut a piece of white fleece that is 4 1/2" tall by 7" wide.  Again, the stretch of the fleece goes from side to side on the scarf.

3.  Overlap the white fleece over the pink fleece by 1 1/4".  Stitch across the top using a zig-zag stitch.  (Practice on a scrap piece of fleece first to decide on the stitch length and width of the zig-zag.)  Stitch across the bottom using a zig-zag stitch.  If the stitch isn't perfectly straight, don't worry about it, just trim the white fleece down a bit so it appears that it is.  No one will ever know. ;)

4.  Sew the ribbon on in the center of the zig-zag stitches, turning under each end first. 

TIP:  When you are sewing ribbon on, it's best to start on one end and sew down both sides of the ribbon in the same direction.  This helps to prevent puckering. It also helps to pin it first and gently pull it taut as you sew.

5.  Cut the fringe about 1/2" wide.  Each cut doesn't need to be measured exactly, just make them pretty close to the same size.


To Add an Embellished Initial

Find a chunky font that you like and print out the letter in the size that you want.  This letter is 4" tall.  I used WordArt in Microsoft Publisher to make the pattern.  Choose a color for the line and no fill color to save on ink.  Roughly cut around the paper pattern, pin it to the felt, and then cut through the paper and felt layers at the same time on the line. (You can do this when cutting out clothes patterns too, it saves a lot of time.)


The girls embellished the felt letters with sparkly gems and I hot glued them to the felt for them while they were doing another activity.  They LOVED this.  In fact, when I took the lid off of the tin with the gems in it, there was an audible gasp (all in unison) when they saw them, it was sooo cute!  


In the interest of time, I safety-pinned the letters (from the back) to each of their scarves with those teeny little gold safety pins.  This way they can take them off to launder the scarf.  I chose hot glue for the sole reason that it dries quickly, there are other glues you can use that are washable.


The girls (ages 5-8) all loved the scarves and were so thrilled that they got to 'design' them themselves.   Before they left the party they all made plans to wear them to school the next day, how adorable is that!  :)

Of course with different color choices this scarf could be made for other holidays and party themes as well.  Let me know if you think of any fun ones! :)
 
Have a great weekend!

Today's Fabulous Find...Girl's Fleece Scarf


Linking up to:
Pin It!

6.28.2011

Guest Posting: Pocket Full of Pink

Today I'm guest posting over at Pocket Full of Pink and am happy to have Karen here sharing a fun redo tutorial with you.

Hello!  I am Karen From the Blog Pocket Full of Pink.  I am so excited to be here and show you a few of my favorite projects from my blog Pocket Full of Pink.  I love all things crafty and find it relaxing to find junk and make it into something I love!


I am so excited to be here and show you my blog and the project I have been working on lately!  
Here are some are some of my favorite projects that I have made:

Flower Wall Art
I love that it was so easy and quick to make and I used supplies I already had on hand! Click here to see how I made it.

Spring Barnwood sign 
Here's a sign I re-purposed from an old sign I got at Salvation Army!
You can see the tutorial here.

I Love you Valentines Frame
I used lots of supplies I had on hand for this cute Valentine frame.  Find the tutorial here.

Today I am going to show you my T-shirt Makeover:

I was at Target the other day and found 2 of the same shirt for $2.50 each.  They were long sleeve and V-neck.  I knew I had to buy them and try a make-over with them!  I have been wanting to try this for months, but haven't had the courage too.

I stumbled across this blog a few weeks ago, and I love her shirt redo tutorials.  She gives awesome directions!  This is where I got the idea for mine. Now remember, this is the first one I have done and I am NOT a seamstress by any means.  Sewing even kinda stresses me out, but I like how it turned out!

I also used another tutorial from another blog for the sleeves.  They were long sleeves, but I changed them to 3/4 sleeve length.  I feel terrible, because I can't remember the name of the blog that I got that tutorial from.  If anyone knows, please tell me so I can give here credit!!


The neckline seemed a little stretched out when I was done, but I was planning on wearing that white shirt underneath anyways (don't like the cleavage look).
I really was happy with the way it turned out.  I have been wearing it everywhere!


It probably took me about 2 hours to make, but for my first time, I don't think that was too bad!

Thanks so much for letting me visit Janet!  I would love you to stop by my blog Pocket Full of Pink anytime!

Thanks for visiting Karen! 


Pin It!

5.11.2011

Embellished Jean Shorts

Look what my 13 year old daughter made!  I couldn't be more pleased. :) 

She asked me last night if I'd like to see what she made and I was so shocked when she showed me these embellished jean shorts.  She designed and made them all by herself while I was in my youngest daughters room sorting through her 'treasures'.   She was so quiet about it that I had absolutely no clue that she was even making anything.


She first took a pair of her old jeans and cut them off into shorts and frayed the bottom edges.  Then she used the jean leg to cut out the layers of flower petals. 

She used a black permanent marker to draw around the edges of the flower and then frayed the edges a bit.  Not a bad idea, right!  After all, permanent marker never comes out of  kids clothes, so why not put it there on purpose for once. ;)


There were only a couple of drawbacks, one small, and one kinda big. 

The small problem is that she used hot glue to glue on the little gems.  They probably wouldn't last long in the dryer, but it would be easy enough to glue them back on with permanent fabric glue. 

The big problem is that when I asked her if she'd go put them on so I could see how they looked....she discovered that the shorts were too tight and they no longer fit her!  I felt so bad!   I guess someone could argue that this is also a 'small' problem (hee, hee).   She's not worried about it though, she said that really she just wanted something to do. :)


Today's Fabulous Find...Embellished Jean Shorts


Pin It!

4.30.2011

Hooded Bath Towel Tutorial

One of my favorite things to give for a baby gift is a nice, fluffy, hooded towel.  This is why.  I think there is almost nothing more adorable than a baby all snuggled up in a hooded towel right after their bath with their sweet little face peeking through.  When the baby is smiling it's even better!  So when I give a hooded towel...I like to think that I'm giving the parents more than just a towel, but sweet moments and memories with their baby.    


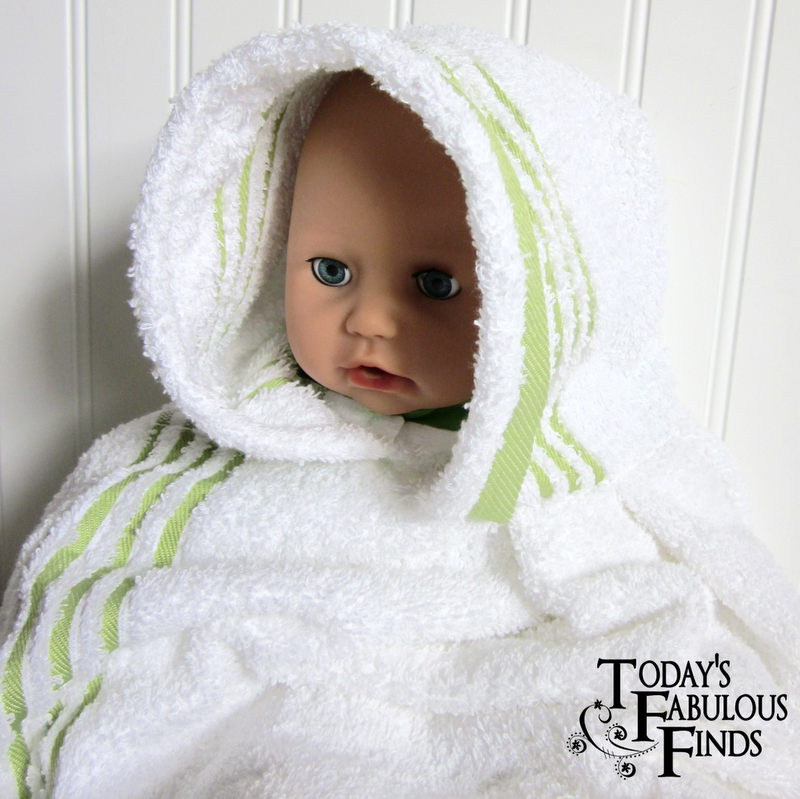
My daughter loaned me her Baby Annabell doll to use as my model so I could try to show you how the towel fits.  I'm pretty sure she thought I'd gone nuts when she saw me taking pictures of her doll in a towel!  I'm afraid that blogs can make moms do crazy things sometimes. :)


My Mom taught me how to make these hooded towels years ago and she's made them for years before that.  I've used several different styles of hooded towels, but this one has always been my favorite because of the pleats on the sides that bring the towel in snug around the baby's shoulders.


Hooded Towel Tutorial
 
 If my directions don't make sense, just look at the pictures, a picture is always better than words. 
(I wish the pictures weren't so dark, but there was a storm outside when I took them.) 


1.  You will need one bath towel and one hand towel.  If you want to make two hooded towels, you'll need to buy two bath towels and just one hand towel.

2. and 3.  Cut the hand towel in half.  (One hand towel will make two hoods.)

4.  Take one of the hand towel pieces, place it right side up, and then turn the finished edge over about 1" or so, pin and sew it in place.  If your towel is small or if you're making it for a toddler, you might want to skip this step so the hood will be deeper.   Also, if the towel has a pattern, or if you would like to have the binding on the towel on the front edge of the hood, you can cut 1" off of the cut side of the towel instead of turning the towel back in the front of the hood.


5.  Fold the left side of the towel over so the towel is in three even sections.

6.  Hold onto the top right corner of the side you folded over and fold it down to the left, so it makes a triangle at the bottom.

7.  Repeat with the right side.

8.  You now have a hood.  Line up the bottom edges, pin together, and sew using a 1/4" seam allowance.  Sew over it again with a serger or use a wide, close, zig zag stitch to prevent fraying.


9.  Back view of the hood.

10.  Fold the bath towel in half and mark the center with a pin.

11.  Fold the hood in half and mark the center back with a pin.

12.  Lay the towel down, right side up, and then lay the hood on top of it, right sides together, matching the pins in the center.  

Pleats:  You will sew three pleats on each side of the towel (about 1" wide or so, depending on the size of your towel).  When you pin them, make sure that the folds of the pleats are all facing the center on the hood when you are looking at the inside (wrong side) of the towel.   The pleats will all fit between the folded back band on the front of the hood and the center back flat section of the hood (see back view).  There will be about 6 or 7" of towel left on each side that isn't pleated to wrap around under the baby's chin.


13.  Before you sew the pleats in, fold the hood and towel in half and make sure that both sides of the towel are the same length.

14.  Sew through all of the layers.  It will be thick, so sew slowly.  You can sew it twice to reinforce the stitching if you'd like.  (Optional) Zig-zag along the edges of the seam, through all layers, to finish the edge and hold the layers together.  Clip any frayed edges that poke through the zig-zag.

15.  Clip the threads and you're done!  You could add an applique to the towel, or embroider the baby's name on it if you'd like.

Update:  More pictures of how to fold the hood.


Sometimes, if the towel is plain, I'll sew a patterned ribbon onto the hood, in the spot where the green stripes are on this one.  The ribbon should be sewn on first thing after you cut it in half.  When you sew ribbon, sew it in the same direction on both sides to avoid puckering and turn the ends under so they won't fray.
This towel is a bit large for a newborn (I preferred the smaller terrycloth towels for newborns), but will fit a baby from around 3 months old until they are around 4 years old.


Price of a hand towel...$2.88
Price of a bath towel...$3.88
Sweet moments with baby...Priceless!
 
I hope you'll enjoy these towels as much as I have.

 Today's Fabulous Find...Hooded Baby Towel

 
I'm linking this post up to some really great parties!  Click on the links to go directly to the party.
Blogger sometimes gives me problems when I edit the HTML in my posts,
so please Click here to see the party buttons. 
 
Tip Junkie   Today's Creative Blog   Home Stories A TO Z    All Thingz Related    Ladybug Blessings
Under The Table and Dreaming     I Love Naptime   Skip To My Lou   Mad In Crafts    Dittle Dattle  
Embellishing Life   The Girl Creative   Miss Crafty Pants   Keeping It Simple  
Making The World Cuter   The DIY Showoff    Sew Much Ado    My Backyard Eden
 Seven Thirty Three   Someday Crafts   Creations By Kara   Fireflies and Jellybeans  
House of Hepworths    Beyond the Picket Fence
Pin It!

4.14.2011

A Bunting and a Blunder

The other day I had this idea to use some 30's reproduction fabric scraps, that I had, to make an Easter bunting. 

I made a pattern (from a cereal box) and then spent most of the afternoon choosing fabrics and pairing them together, cutting, pressing, sewing, and pressing some more, and that was all just to piece the triangles.


(To finish them I zig-zagged over the fabric onto warm and natural quilt batting,
trimmed the batting to 1/4", overlapped them, and sewed them together.)
 
 
I was only half finished with the bunting when my husband came home from work.  Excited about how it was going so far, I showed him the unfinished bunting, that was pinned together and hanging from the shelf, and then casually asked..."so what do you think?"  Well...this is what he (kindly) said..."it looks like you slapped a bumper sticker on a Lamborghini, I don't like it (and then he paused and added)...at all."  Wow!  I wasn't expecting that one!  lol!  Bumper sticker on a Lamborghini?  Generally he has no opinion when it comes to decorating (he's a smart man), so seeing that I was a bit taken back, he reminded me that I asked.  Yes, I did...I did ask.

(Now, by sharing this I'm in no way trying to imply that I think my vignette is of Lamborghini quality, I'm way more realistic than that!)


So what did I do?  I chose to focus on the back-handed compliment my husband gave me (the reference to the Lamborghini) and finished the bunting, and yes, I went ahead and hung it up too!   What did he know...right? 

Well...turns out he knows a lot more than what I give him credit for!  I realized later that I kind of forgot to mention to him that it was an Easter decoration (it was the first thing up), he assumed I was going to hang it from my spring vignette year round...oops!  How was he supposed to know, right?  :)

 Today's Fabulous Find...Bunting for Easter, Birthdays,
or...why not, just hang it up year round! :)

Pin It!

3.30.2011

Denim Bag/Purse from Girls Jeans

Last weekend my daughter and I made an embroidered denim scripture bag from flare jeans that she has outgrown.  The flowers were already embroidered on the bottom of the jean leg, so I just cut the bottom of the jean leg off, turned it upside down, stitched across the bottom and voila...an instant bag!  Then, of course, we added a few more things to make it fun. :)


Directions:

Cut the bottom of the jeans off at the height that you want your bag.  Add extra for a flap at the top and for the seam at the bottom of the bag.  (Since my daughter is using this bag for her scriptures, we put them inside the jeans to measure how tall the bag needed to be.)


To sew a pocket on:   Cut the pocket out of the jeans by cutting right along the outside edge and through both layers of denim.  Pin it onto the bag and then stitch right next to the outside edge of the pocket, then stitch again about 1/4 inch in from the first stitching.  If you match the thread color to the denim, you won't even notice the stitching lines.

To stitch the bottom of the bag, turn the pant leg inside out and then upside down.  Stitch across the unhemmed edge and then stitch across each corner to make the bottom of the bag.

 
To make a flap, cut the bag down on each side (right next to the side seam of the jeans), fold the front down and stitch the sides to hold it in place.  I made this one so that the flap closes on the inside of the bag (she really wanted a flap to close).  If you don't add the belt loop, you could close the flap to the outside of the bag.  Stitch on a piece of velcro or add a snap to the flap to keep it closed.
 
 
To add a belt loop (pen pocket), cut the top of the jeans off next to the stitching, cutting around the bottoms of the belt loops as you go.  (Don't unpick the thread, just cut up close to the stitching on the belt loop.)  Pin the top of the jeans around the top of the bag and then stitch it at the top and the bottom.  Cut, then fold the end of the waistband under and stitch it at the end.  (This makes a little pocket that is just the perfect size for a pen.)  Stitch the belt loops to the bag. 
 
To add a handle, cut up the side of the pant leg (against the stretch of the jean) so their is a seam on one side.  Open it up and fold the two sides in so the cut edges are in the center and the seam is on the bottom in the center.  Sew a piece of ribbon on top, over the cut edges, along each side of the ribbon.  (This will enclose the raw edges.)   Turn the end of the handle in, that isn't already hemmed, and stitch it to the inside of the bag.  Stitch the hemmed side to the other side of the bag.  You're done!
 
 
I pushed the bottom of the bag up to show you how it would look as a purse.  For a purse I would make two handles instead of one.  Bright colored wide ribbon or a scarf for the handles would be so pretty, don't you think?
 
 
I also made a scripture bag for my son that is similar, but with the flap on the outside and the handle on the side.  He picked out the fabric all by himself, can you tell?  ;) 
 
Today's Fabulous Find...Making a Denim Bag from Girls Jeans
 
 
Pin It!

1.20.2011

How To Make Your Own Pillow Form

I decided to make the pillow form for my son's tooth fairy pillow instead of buying one.  I had the time and I already had all of the materials, so rather than spending around $10 for a pre-made form, I was able to make this one for free.  Gotta love free!

  
I forgot to take a picture of it with it stitched closed...oops!
 

I bought this white fabric several years ago at Wal-mart for $1/yd.  It was such a great price I think I bought 10 yds of it.  I've used it to make a lot of things.  Every time I'm at Wal-mart I check out their discount shelf.   Their discount fabric is now $1.50/yd, which is still a good price.   The fabric changes some from week to week so it's worth taking a minute to see what's there.

 
How To Make A Pillow Form
 
 
1.  Start by cutting two squares.  For a 16" pillow form add 1 inch for a 1/2" seam allowance on each side and 1" for the fullness of the pillow.  The cut size will be 18"x18".  (I  folded the fabric over to eliminate one seam, so the fabric piece in the picture is 17 1/2"x18.")
 
2.  Sew around the fabric using a 1/2" seam allowance.  Leave about an 8" opening at the top.  A little trick I've learned is to pin back the top layer of fabric at the opening and continue sewing on the bottom piece.  The stitching will be used later as a guideline when you slip-stitch the opening closed.
 
3.  Turn the fabric right side out.
 
4.  Cut two pieces of bonded batting 18"x18".  I took batting scraps that I had, stitched them together by using the zig-zag stitch on my sewing machine, and then cut them to size.
 
 
5.  Sew around the batting with a 1/2" seam allowance, leaving a 7" opening, then turn it right side out.  The layer of batting helps the pillow form to have a smoother surface after it is stuffed.
 
6.  Stuff with polyester stuffing then slip stitch the opening closed.
 
7.  Fold the pillow in half and insert it through the opening of the fabric cover.
 
8.  Pin and slip-stitch closed.
 
It's definitely easier to just go buy a pillow form, but if you already have everything you need to make one, and you have the time, free is always nice too!
 

Today's Fabulous Find...How to make your own pillow form. 

Pin It!

1.19.2011

Tooth Fairy Pillows

Last week I finally made a tooth fairy pillow for my oldest son.  Somehow I managed to put off making it for 5 years!   Procrastination at it's best, I tell you! 


The pillow is all done now though and let me tell you, the tooth fairy is sooo grateful! 

No longer will she be slowly moving her arm back and forth under the pillow, reaching under it as far as she can, fearful that if she raises the pillow too high his head will roll off and he'll wake up, then realizing after the search is complete that the tooth she is looking for is NO LONGER THERE!

No longer will she be searching for it under the bed, between the mattress and the wall, and in the dark, in fear of the possibility that she might grab something other than his tooth...like a spider! 

The tooth fairy will no longer have to wonder if my son tried to challenge her magical Tooth Fairy powers (again) by hiding it somewhere in his room, as a test of sorts, to see if she is real.  "Don't worry Mom, if the Tooth Fairy is real, she'll find it."

She won't have to worry that she will find it, only to have the noisy plastic  bag that he put the tooth in wake him up, forcing her to lay low to the floor like a thief in the night, for what feels like an eternity, until he falls back to sleep.

Yep, she's one happy tooth fairy!  

Now she can rest assured that when she arrives to gather the tooth and leave the reward, the tooth will be ready and waiting at the foot of the bed. 

No more searching, no more close calls.  

She is very grateful that I finally got the pillow made and wonders why it took me 5 whole years to get it done!  I suppose though if I had finished the pillow, she wouldn't have all of those fun times to remember! :)


Having a tooth fairy pillow is not only a HUGE help to the tooth fairy, but it's also fun for the kids.  My daughter likes to leave little notes for the tooth fairy in the pocket with her tooth.  The tooth fairy replies (in fancy writing) on the same note so we'll have it to keep in her memory book.

If you want to try making one, you can find directions for  Three Ways to Make a Pillow Cover at MarthaStewart.com. 

Follow the directions, adding a pocket to the front or back of the cover before you sew the outside seems.  If you aren't up for sewing a whole pillow cover you can add a pocket to any pillow by hand-stitching it on. 

Tips

*I wanted to add piping to the front of my Son's pillow for interest, but also wanted the airplanes to still match up.  To do this, I cut a separate strip of fabric (that matched the fabric under it) for the center, sewed the piping to the edges of the strip, and 'stitched in the ditch' between the piping and the fabric strip to sew it onto the front.  (Stitching in the ditch is when you stitch directly over a seamline so you don't see the stitching.)


*I was surprised when I bought the cotton cording, that nothing had been done to prevent the ends from fraying.  One end was already frayed a full two inches and by the time I got home, the other end was too.  It's such a waste.  There is a solution to preventing cotton cording from fraying.


Just wrap a piece of tape around the cording before you cut it.  Pretty simple.


More Tooth Fairy Pillows

Do you believe that after over 25 years I still have my tooth fairy pillow?  My mom made it for me.  It's a bit lumpy and worn, but overall I think it's held up pretty well.  (It helps that it's been in a storage box for at least half of that time.)


One of my sisters made these two very cute pillows for her daughters.  They both wanted pom-poms on their pillows so they would look like their Mom's tooth fairy pillow.  Love the pom-poms!


Back of Pillow
The pocket is the pink square on the right.


Click here for a tutorial on how to make your own pillow form.


I've often wondered how common Tooth Fairy pillows are.  Did you have a tooth fairy pillow? 
Do your kids have one?  
Has the Tooth Fairy ever been caught at your house?
Does she leave fun surprises?
Please share. :)
 
 Today's Fabulous Find...Tooth Fairy Pillows


Linking up to these great parties!


Making Keeping It Simple The Girl Creative  All Thingz Related Show and Tell Green Creations by Kara Make it Yours @ My Backyard Eden  http://www.thethriftyhome.comHookingupwithHoH Beyond The Picket Fencegiveaways The DIY Show Off Chic on a Shoestring Decorating Join us Saturdays at tatertotsandjello.com for the weekend wrap up party! monogram UndertheTableandDreaming Funky Junk's Sat Nite Special BWS tips button
Pin It!

LinkWithin

Related Posts with Thumbnails