Showing posts with label printables. Show all posts

4.11.2012

Personalized Teacher Subway Art

Teacher Appreciation Week this year is May 7th-11th. 

Last year I made up a subway art print that can be personalized for each individual teacher, I thought I'd share it again this year.  The prints have a blank space where you can add the teacher's name and several have a blank square in the center to add an image of your choice-- it could be the school mascot, a character that the teacher loves, a picture, whatever you like. 


What to Do With It

You can print the subway art and frame it, use it as a card or tag, attach it to a square box of Kleenex's for their desk, put it inside a bottle of anti-bacterial soap, use it as the cover of a keepsake book....

Before I gave the subway art to my kid's teachers last year, I cut out pictures of all of the kids in the class in a circle about the size of a quarter (I scanned and enlarged their class picture and then printed it on photo paper.), and added the pictures around the outside edge of the print between the glass.  

Several Prints to Choose From


How to Personalize the Subway Art with a Teacher's Name

I think the easiest way to add the names would be to first save the print to your computer and then upload it into Picnik (while it's available), PicMonkey, or another online photo editing program.  Once it's uploaded select to add text, choose the font you like, type in the teachers name.  Drag the name to the blank box and size it to fit the space.  Save it to your computer and then select to continue editing the photo.  Now you can select the name, type in a new teachers name if you'd like, and resave it. 

If you want to cover the apple, select 'shapes' and then add a white square over the apple.

 Click Here to download the Teacher Subway Art Prints 
and for more information on the framed print pictured above.


Pin It!

2.19.2012

St. Patrick's Day Subway Art and NEW Free Printables Menu

For quite some time now it's been my intention to make up a menu for the free printables available here at Today's Fabulous Finds, and another menu for projects.   The free printables menu is finally done, but the project menu is still coming along ever so slowly. 

The first part of the menu has links to a subway art print for every major holiday and season.  One of the prints is for St. Patrick's Day. 


It, and all of the other subway prints, is available in an assortment of colors because I can never choose just a few. ;)


Other parts of the menu include prints that I've designed as well as links to prints that I've featured. 


To view these projects and more if you're viewing this post in a reader/e-mail, click the link below.

By the way, I trimmed my wheat grass down for the first time yesterday and it smelled just like a newly cut lawn!   It was such a welcome distraction from the gloomy weather outside.  

 Hope your weekend is going well!  

Pin It!

10.13.2011

Printable Halloween Countdown {Wood Block Version}

Countdown calendars can be a fun way to build up some excitement and anticipation for an upcoming holiday.  For any of you who meant to start a Halloween countdown but saw the 1st of October come and go and just didn't quite manage to get one started, no worries, this countdown doesn't start until the 21st of October.  That means you're not late at all, why in fact, you're early!  There's still plenty of time to get one made. 

The colors are purple, orange and green.

Finished Size:  2 x 7 1/4 x 9
or
Use a thinner board and display it on an easel.

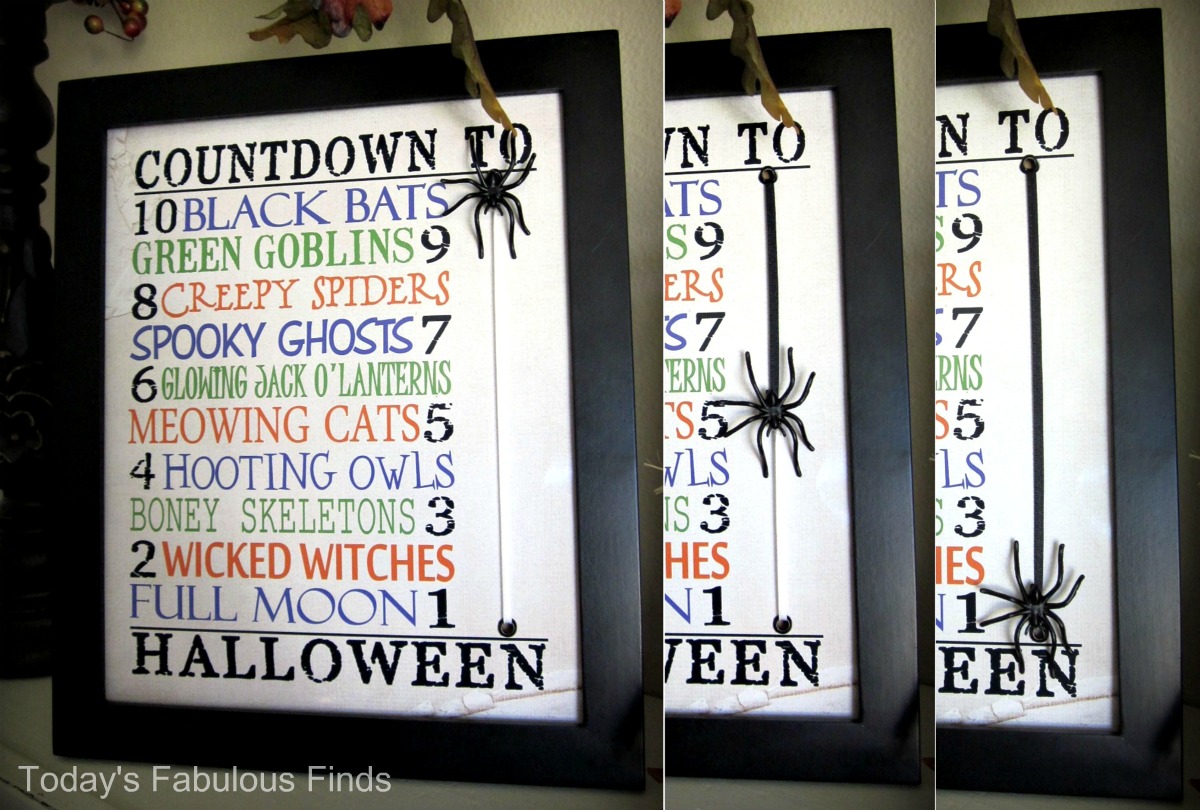
Here's how it works: Every day you move the spider down one number and it's web gets longer and longer until you reach Halloween.  Simple, yet fun.


These are really pretty easy to make, the steps are very similar to the photo/recipe blocks that I just made.  I even used a scrap board from that project to make it.  You can refer to the directions given for the framed version of this countdown found here for more tips and pictures of the steps.

Supplies
Halloween Countdown Print
2x8 Pine Board cut to 9" long (actual width measurement is 7 1/4")
Black Paint and foam brush
Mod Podge
Sandpaper
Clear acrylic spray (matte finish)
Distress Ink in Dark Walnut (optional)
@15" each of 1/8" black and 1/8" white ribbon
small plastic spider
2 eyelets

Halloween Countdown Block Directions
Prepare the Printable

These prints are sized to fit a block that is 7 1/4" wide and 9" tall.  You may need to trim the print down some.  For directions on how to download/copy the print, click here and scroll down.  Be sure to click on the image first before you save it to bring it to full resolution.


The clip-art images are for making memory/counting games to play with your kids/grand kids while you count down.  All clip-art is from Microsoft.  I found the countdown nursery rhyme at  Halloween Nursery Rhymes Chants and Charms.


Because I printed the countdown on my home printer onto photo paper, I sprayed it with a couple of thin coats of clear acrylic matte finishing spray first.  It helps prevent the ink from smearing when the Mod Podge is applied.  I printed the image with the white background and then added distress ink to it to give it an aged look.  I've included a printable with an aged background if you'd like to use it and skip the step of antiquing it.


I don't know if this is the correct way to do it, but it works.  To apply the distress ink, put a scrap of knit over your finger, dab it in the ink and then lightly brushed it across the print.  Use a clean part of the rag to rub the ink in to blend it.

Paint the Block and Apply the Print

Follow the directions in my tutorial for the photo/recipe blocks found here to finish the block and to apply the printable. 

*Before you Mod Podge, spray the block with a clear acrylic sealer. It will make a big difference in the finished appearance of the block.
Applying the Mod Podge

When you apply the top coat of the Mod Podge, spread the Mod Podge on evenly with a foam brush then take a crumpled up plastic grocery sack and pat the wet Mod Podge with it.  It gives the print an aged, crumpled paper look.  Use a paper towel to wipe off any excess Mod Podge on the painted area of the block.  Let dry.

Wet Mod Podge after patting with plastic grocery sack.
Inserting the Eyelets

1.  Drill a hole the size of the eyelet or just barely smaller through the print and the wood.  Gently pull off any excess wood or paper from around the hole.
2.  Line up the eyelet with the hole.
3.  Put the eyelet tool on top of the eyelet and gently hammer the eyelet into the hole.  You may need to use a large nail to push the eyelet against the inside of the hole if there are any rough edges that could catch the ribbon.


Adding the Spider
Follow the directions in the framed countdown tutorial to add the ribbon and the spider.


If you missed yesterday's post,  Click here for a tutorial on the 10 minute framed version.  In this post there are also suggestions on how to make it for an elementary school class activity.


There are some fun possibilities for using this style of countdown for other holidays as well for ex. Santa coming down the chimney, a falling snowflake, etc.  I've already started on a Christmas countdown print for my neighbors and friends.  I think it will be a great motivation to get the gifts done and delivered earlier in the month when life is a little less hectic.


Remember, the countdown doesn't start until the 21st, so there's still time to get busy and make one!  

Today's Fabulous Find:  Printable Halloween Countdown Calendar


Under the Table and Dreaming   Skip to my Lou Embellishing Life The Girl Creative Sew Can Do Making the World Cuter Keeping It Simple Dittle Dattle  Home Stories A to Z
Pin It!

10.12.2011

10 Minute--10 Day Halloween Countdown {A Working Printable!}

I've so been looking forward to sharing this printable with you because you see, it's much more than just any old printable, this one has working parts!  The best part...it only takes around 10 minutes to make and only counts down the 10 days before Halloween, so there's still plenty of time to make one!  Yay!


The other day I was searching for a Halloween poem and found this fun countdown poem at Halloween Nursery Rhymes Chants and Charms (I've since found out that it was written into a children's book as well). My first thought was that it would make a cute printable to frame.  Well, one idea led to another and next thing I knew the print had morphed into a 10 Day Halloween Countdown Printable with an actual moving spider! 

Here's how it works:  The spider starts out at the top of the countdown...


 ...then each day you move the spider down one number so the web gets longer...


...and longer...as each day passes...until it reaches Halloween. 


I think I've had as much fun moving that little guy up and down as my kids have (maybe even more). :) 

This may be one of the easiest countdowns you'll ever make.  Here's how you put it together:

Supplies

8x10 Print of the countdown
8x10 Frame without glass
(I used a frame that I already had, a chunky distressed frame would look awesome!)
12" piece of 1/8" black ribbon
12" piece of 1/8" white ribbon
2 eyelets and kit/pliers to set them (optional)
Small plastic spider
(The spider rings will work great if you cut off the ring part of it.)
Hot glue gun and glue

Directions
 I put in a lot of details, but really, if your supplies are all gathered you can make this in 10 minutes.

1.  Print the countdown as an 8x10.  If you don't know how to print the images, click here and scroll down to the bottom of the post for directions. (Trim to fit your frame if needed.)

2.  Poke a hole through the circles in the print with a sharp pair of scissors.  Insert the eyelet into the hole from the front of the print and set by using eyelet pliers or an eyelet kit and hammer.  (To use an eyelet kit, put the kits setting tool (no idea what it's really called) on top of the back of the eyelet and hammer on the top of it until the eyelet is flat.)

These are old prices, I don't know what they cost now.
3. Cut one 12" piece of black and one of white ribbon.  Tie the two pieces together at one end and clip the ends short.  Hot glue the spider over the knot.  Thread the ribbon through the holes so the spider is in the middle of the two eyelets and the black ribbon is showing above it.  Tie the ribbon in a knot on the back of the print in the middle, leaving the ribbon slightly loose.  Test the spider to see if it slides up and down easily and if the black ribbon goes all of the way to the bottom when you lower the spider, if it doesn't, loosen or tighten the ribbon accordingly.  If it's tied too tight the spider won't move as well.  Clip the ribbon 1/2" from the knot.
Pictures taken before I decided to use eyelets.
4.  Put the print in the frame.  You could put a clear plastic transparency sheet in front of the print before you add the ribbon and eyelets, or apply a layer of Mod Podge over it if you want to protect the print.

5.  That's it, now you can enjoy your new countdown!

Halloween Countdown Printables
For Personal Use Only

*If you would like to share these prints with your readers, please use one of the photos above for your post and include a link back to this post for the prints. Please do not post the prints on your blog, thank you! :)


I gathered some clip-art images from Microsoft to go along with the countdown.  For young children you could print two copies to use as a memory game or crop the image in a document and make duplicate copies of each clip-art to use for counting games each day.  For ex. print: 1 moon, 2 witches, 3 skeletons...

The black and white image could be copied onto colored card stock to make (unframed) in an elementary school class as an activity.  The children could circle the numbers in crayon to make them easier to see.


Click here and scroll down to the bottom of the post for directions on how to print the images.

When I showed the framed countdown to my sister, she said, "You know what would also look cute is if it was on a wood block".   I knew she had a great idea going there so I made one up that very night (I couldn't wait to give it a try) and she was so right!  Always listen to your sisters. :)


I'll show you how to make it tomorrow.  :)
Updated:  Click Here for the Tutorial

Today's Fabulous Find...Nursery Rhyme Countdown


Tip Junkie handmade projectsVisit thecsiproject.com
Pin It!

9.07.2011

Fall Subway Art Prints

Fall has arrived which means it's time for a new subway art print to switch out the summer design (maybe even a bit past due).  I thought it would be fun to show you another way to display the subway art in addition to simply framing it this time, so I made a little wood block pumpkin and just taped the print on.  This way I don't have to commit to just one print and I think it will be fun to display a picture of my kids in their Halloween costumes on it too.  The little ones love to see themselves all dressed up!


This pumpkin is pretty similar to the pumpkins I made last year here and here.  I'll share the details on how I made it in another post (click here for the tutorial) and also show you another photo block I made last week that's made so you can switch out the prints whenever you want (without taping them).

There are 16 color choices,
including one with a black background that isn't pictured.

All prints are saved as high resolution jpegs.


For Personal Use Only

If you would like to share this subway art with your readers, I ask that you use one of the photos or the color choice image above and then link back here for the prints. Please don't post the prints on your blog. Thank you! :)


Use the black and white print to print/copy onto scrapbook paper, or colored paper. It's also the best print to start with if you want to recolor the subway art.

*For even more color choices, read through my tutorial on
To download: You must first click on the image to open it in a new window in it's highest resolution. Right click on the image and either copy and paste it into a document (to size and then print), or click on save image as to save it to your computer. You will need to size it before you print.
To size the prints: The prints look will look the best printed as an 8x10 or 4"x5" (for a card), but can be stretched to other sizes if you insert them into a document using a program like Microsoft Word/Publisher or Photo shop. Insert the image, click on it, then drag the sides of the image to the size that you want. (A 5x7 will look a bit stretched with this design.) 
*You can also save the image to your computer and then use your computer's picture manager program to print it as an 8x10.
Print them on white or colored card stock, scrapbook paper, or (for the best quality) on photo paper. (Check your dollar store for photo paper, I buy packages of 8- 8x10 sheets for only $1.)


I'm really happy with how this fall subway art print turned out and had a fun time deciding on the words to use for it.  Words I thought best to leave out for a fall theme:  sneezing, itchy eyes, dry skin, runny nose, scratchy throat...allergies. Lol, maybe for next year. :)

Hope you like it!

Today's Fabulous Find...Fall Subway Art

Linking up to these fabulous parties!
Pin It!

LinkWithin

Related Posts with Thumbnails