Showing posts with label recipes. Show all posts

11.07.2012

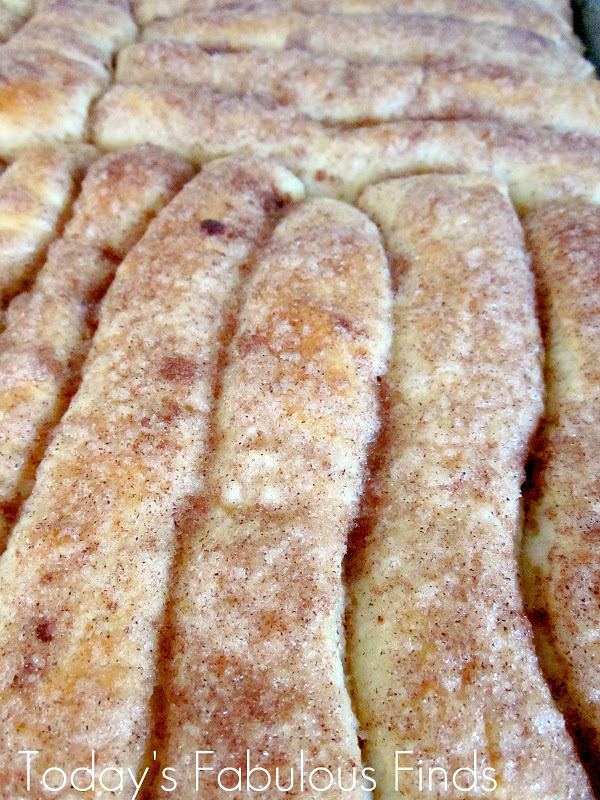
Pull-Apart Cinnamon Breadsticks and Dinner Rolls from one Delicious Recipe


More often than not these days when I want freshly baked rolls for dinner I buy a bag of frozen roll dough at the grocery store.  Occasionally though when I have a little extra time in my day I'll bake them from scratch.   Last week I finally got around to trying a recipe for Melt in Your Mouth Dinner Rolls at Sew Dang Cute Crafts that I'd bookmarked months ago.   My family LOVED them!


We all liked them so much that I made them again a few days later and took half of the dough and made it into pull-apart cinnamon breadsticks for dessert.  This roll dough recipe is large enough to make 12-16 rolls with one half of it and an entire cookie sheet full of pull-apart cinnamon breadsticks with the other.


Pull-Apart Cinnamon Breadsticks

Make one batch of roll dough.  Let rise.  When dough has doubled in size, divide in half.  Roll out one half of the dough into a circle to use for rolls and roll out the other half into a rectangle to use for pull-apart cinnamon breadsticks.

1.  Roll dough into a rectangle shape.  Use a pizza cutter to cut dough into 1" by about 6-7" long strips.
2.  Dip in butter (or brush on both sides) then in a mixture of sugar and cinnamon.
3.  Place on cookie sheet (you could twist them first if you like), cover, and rise to double in size.  Bake following the roll dough recipe directions or until fully done.  Store in a sealed plastic storage bag.


This is a simple roll dough recipe with basic ingredients and a great taste.  Thanksgiving is right around the corner (if you don't already have a favorite roll recipe you use) you might want to consider adding these rolls to your menu!  


Today's Fabulous Finds...

Melt in Your Mouth Dinner Rolls  
and Pull-Apart Cinnamon Breadsticks


Pin It!

5.21.2012

Featuring: Dripping Roast Beef Sandwiches with Melted Provolone


source

I've made au jus sandwiches many times over the years, but never with french onion soup until just recently, have you tried it?  It's really quite good!

We've eaten it with provolone cheese and with cheddar cheese, toasted and untoasted, and liked it all.  I'm not sure how I like the peppers though, I think it's a preference thing, but the french onion soup is the secret ingredient, it really makes the sandwich.  (You might even want to use more than one can of soup.)

This is a simple recipe to remember for a day when you don't have a lot of time to cook dinner.   Let me know how you like it if you decide to give it a try!


Pin It!

4.24.2012

Featuring: Asparagus and Tater Toss Recipe

When I was a young girl I loved to pick asparagus.  I grew up in the country where it grew along the fencelines (on the outer edges of the fields) near our home.  Some days my siblings and I picked enough to fill an entire grocery sack, which we took home to our mom to cook for dinner.  It was so good!   I don't know if it would have tasted as delicious to me though if I hadn't picked it myself.

Kristyn just posted this recipe for Asparagus & Tater Toss over at Lil' Luna and I can not wait to try it!  It's going on the menu this week for sure.  If you like asparagus you've got to go check out this recipe--it has bacon! 

My thanks to Kristyn for permission to use this photo.  Please pin it from the original post.

Today's Fabulous Find:  Asparagus & Tator Toss Recipe


Pin It!

1.24.2012

Best Homemade {Non-Chocolate} Pie

Once a week we set a night aside that we do something together as a family and it always ends with a yummy treat.   Last night we ate, as my husband called it, "the best homemade non-chocolate pie that I've ever eaten".  Yes, those are big words, but it really was that good!


My husband gets the credit for this 'find'.  He found the recipe at Kraft.com and made it (Yep, he cooks...I know, I'm very lucky!).  He said that it wasn't even hard to make like some pies can be.   I think what made it extra special was the crust, oh, and the cream cheese.   Cream cheese is always good.

Click here for the recipe.  Enjoy! 

Today's Fabulous Find...Coconut-Cream Cheese Pie


Pin It!

10.07.2011

{Soft & Chewy} M&M Rice Crispy Treats

Today I'm sharing a quick, well-known, and delicious Halloween treat, that any kid would love (even the big one's).


My family loves chocolate, so we always add some M&M's to our rice crispy treats.  I have a yummy recipe that I use (from the Rice Krispies Box in the 70's or 80's) that makes a nice soft treat that's not too gooey, not too crisp .  I like to make a large batch (1 1/2 x's the recipe) so they are nice and tall in a 9x13 pan. 


I've altered the cooking directions from the recipe on the box (an older version my mom had from the 70's or 80's) slightly to get a rice crispy treat that is soft and chewy, this is the way that I make them, I'm sure most everyone has a version that they love.

Marshmallow Treats (1 1/2 x'd)
6 T butter
6 cups miniature marshmallows
7 1/2 cups Rice Krispies Cereal
M&M's (about 1/3 to 1/2 of a medium bag, can use seasonal colors) 

Melt butter in large saucepan over low heat.  Add marshmallows and stir until fully melted and well blended.   Remove from heat.

Add Rice Krispies cereal.  Stir until well coated.  Gently fold in the M&M's.

Poor mixture evenly into a buttered 13x9x2 inch pan, sprinkle a few more M&M's on top and gently press down using a buttered spatula or waxed paper (the paper the butter is wrapped in works great for this).  Press it down enough to push it all together, but not too firmly or the treats will be hard and the M&M's will smash.  Cut into squares when cooled.

Click here for the microwave directions and/or to compare the 70's recipe to the recipe Kellogs uses now.  Today's recipe has less butter and more Rice Krispies.


I put the treats in these cute little bags that I found at the dollar store, there were 25 in a box.  I  like the cute side of Halloween, so I was happy to find them!  When I take rice crispy treats places, I like to individually wrap them.  This way there are no worries that they will stick together on a plate, or that fingers will get sticky.  They can just hold them in the bag while they eat them if they'd like.


I bought this bowl earlier in the year for only $6. At the time I never thought to use it for Halloween, but it was just what I needed.


I put all of the rice crispy treats in it to set out for a funeral dinner.  Right now you might be thinking this is an odd thing to take to a funeral dinner, so let me explain. :)  Most often there are young children in attendance who have just had to sit quietly for what seems to them like a very long time.  I like to take something special and fun just for them to eat at the dinner, or to take with them to eat as a snack on a long drive home (another reason to wrap them individually).


There are so many fun and creative treat ideas for Halloween, some more complicated than others.  This is a simple treat, perfect for parties, to take to the neighbors, or for your own family, that goes together quickly without a lot of mess or stress, which is so my kind of treat! :) 

Today's Fabulous Finds...Fall M&M's and Dollar Store Treat Bags


Linking to:  Tator Tots and Jello
Pin It!

10.02.2011

Cream Cheese Stuffed Strawberries and Thank You's

My kids and I made these Cream Cheese Stuffed Strawberries yesterday.


They're easy to make and my kids loved them!
You can find the recipe at The Artsy Girl Connection. 
 
Last month I was busy getting my kids ready to go back to school and missed posting links back to those who featured my projects.  So these links are for August and September.  Thanks a bunch!!!

The links go directly to their home page. 


If you featured a project of mine in August or September and I missed linking back to you,
please send me an e-mail letting me know so I can add your name.

Today's Fabulous Find...Cream Cheese Stuffed Strawberries


A note:  I'm afraid I'm going to be a bit late posting the Halloween Subway Art. I sketched it out today, but won't be able to work on it again until later in the week.  Just wanted to let you know it's coming. :)


Pin It!

8.10.2011

Creamy Cajun Chicken Pasta

I was searching for a new and simple dinner recipe when I came across this recipe for Creamy Cajun Chicken Pasta at Food.com.  We've eaten it a couple of times now and I must say, it's pretty good!  It's a stove top recipe so there's no need to turn on your oven on a hot summer day--another huge plus!


This seems to be one of those recipes that is easy to adapt to your own tastes and preferences.
I made some changes to the recipe to make it large enough for my family and used a 16 oz box of penne rigate pasta (could use less) instead of 4 oz. of linguine, added about 5 small sliced green onions, instead of 1, and substituted 1 tsp. of finely chopped garlic (from a jar) instead of the garlic powder.   I times'd the rest of the ingredients by one-and-a-half except for the cream, I kept it at 2 cups.  (I was planning to add a little milk if it wasn't 'saucy' enough but didn't need to.) 
The original recipe says it's only enough for 2 servings, but with the changes I made it was enough to feed my family of six (minus a picky eater) plus there was some leftover. 
Tip:  If the sauce is runny, don't worry, it will thicken as it cools.

With over 1100 ratings and reviews, this recipe has a five star rating--not bad!   If you're looking for a new recipe, I'd recommend giving this one a try.


Today's Fabulous Find...Creamy Cajun Chicken Pasta


Pin It!

6.01.2011

Featuring: Chocolate Chip Cookie Pie and Month In Review

Today's fabulous find is dangerously delicious!  Take a look for yourself...

Photo from Our Best Bites
Chocolate Chip Cookie Pie at Our Best Bites

I've already made this...twice!  Of course every single one of my kids absolutely loves it!  We haven't tried the pie with chocolate topping on top, but it really doesn't even need it.

A HUGE Thank You to those who featured my projects in May!  You may already be familiar with these blogs, but if not, go take a look, they'd love a visit!

Tip Junkie featured:


   Game Night In A Bag
 
 
All Free Christmas Crafts featured:
 (I wasn't familiar with this site.  It's full of craft ideas and is worth the click over!)
 
Paint Stick Soap Box
 
 
The Creative Crate and
Serenity Now featured:
 
Teacher/Friend Gift with Printable Tags
 
 
Under The Table and Dreaming,
Craft Gossip, and
The Creative Crate featured:
 
Hooded Bath Towel
 
 
UCreate Parties featured:
 
 
Crepe Paper Flowers

 Pink Cake Plate Diaries:  Versatile Blogger Award
I haven't taken the time to follow the requirements to accept this award, but want to say thanks to Pink Cake Plate Diaries for thinking of me!


If you've featured one of my projects and are not listed here, please send me an e-mail so I can link back to you.

Another Huge Thank You to all of you who read Today's Fabulous Finds!
I can't tell you enough how much I appreciate you.
 

Today's Fabulous Find...Chocolate Chip Cookie Pie!


Pin It!

5.19.2011

Strawberry Freezer Jam: Less Sugar vs. Full Sugar

This week I've been replenishing my supply of strawberry freezer jam.   It's so easy to make and tastes so delicious!   I use the recipe that comes in the Sure Jell box to make my jam.  You can usually find Sure Jell in the section where the canning jars are sold.  

Our Best Bites has a great tutorial on how to make strawberry freezer jam using the recipe in the Sure Jell box if you'd like to learn how to make it.


Less sugar recipe in 1 1/8 cup reusable Glad containers

For the first batch I made, I used the reduced sugar recipe from the Sure Jell box.  I was curious what the difference was between it and the full sugar recipe. 

The less sugar recipe is healthier, so that's a big plus.  It calls for 4 cups of mashed strawberries and 3 cups of sugar, while the full sugar recipe calls for 2 cups of mashed strawberries and 4 cups of sugar--a huge difference! 

Four cups of strawberries -- enough to make one batch of less sugar jam. 
(I put off making the jam for a few days, so they are a bit riper than I would have liked them to be, oh well!)

The less sugar recipe makes 6 cups of jam while the full sugar recipe will make 5 cups.  I noticed that it seems to take more of the less sugar jam to make a PB and J than the full sugar recipe, so it's good that it makes a larger batch.

What I really was curious about though is the difference in taste between the two jams, so  I spread some of each on a slice of bread.  The full sugar jam is denser than the less sugar jam, I'm pretty sure it's because of all of the sugar in it (and probably because I over-mashed the strawberries a bit on this batch--oops--you don't want to over-mash!).

Can you tell which is which?


The full sugar jam is on the left, the less sugar jam is on the right. 


One of the things I noticed first was the difference in color.  I think the less sugar jam has a more natural strawberry color...but on to the big question...how did they taste?

My four year old and I sampled each of them and it was unanimous--2 votes for the less sugar jam.  I was actually surprised that I liked it better because I thought that it wouldn't be sweet enough for me--I was wrong.  To me it has more of a natural strawberry taste and seems fresher than the full sugar recipe.  This is just my opinion though, your taste buds might tell you something different!  The fact that I liked the less sugar jam better doesn't mean that I won't totally love and enjoy eating the jam with all of the sugar in it that I made!  I still think it tastes really good, just in a different way.

The Sure Jell recipe suggests that you store the jam in 1 or 2 cup plastic containers.   I ended up trying a 1 cup round container, a 1 1/8 cup container, and an 8 ounce wide-mouthed Mason jar.  The plastic containers stack well in the freezer and the glass mason jar will be perfect to put the jam in for gifts.

I took them straight out of the fridge and freezer for the picture.  I promise they aren't dirty--just frosty!

The plastic containers cost less than the glass jars and I suppose would be safer to store in the freezer.  This jam can be stored in the fridge for up to 2 weeks and in the freezer for up to one year. 


This package of 4 mason jars cost just under $4.

So I guess the verdict is.....give the less sugar recipe a try. 
If you don't like it, I'm so sorry and please don't be mad at me! :)

If you've tried both the less and full sugar recipes, do you have a preference? 


 ***Next up I'll show you how I packaged the jam for gifts.  I designed a whole page of printable tags, including one for a teacher thank you and one for a friend, and of course I'll be sharing them with you!  Here's a little sneak peek...


Today's Fabulous Find...Less Sugar Strawberry Freezer Jam


Pin It!

4.11.2011

(Simple) Caramel Brownies

Today's fabulous find came from my sister who got it from her sister-in-law who got it from her sister who got it from a free recipe flyer at a grocery store...whew!  You know what that means? ...It's a good recipe...and it's not copyrighted!   I'm SO glad I can share it with you because I find these brownies to be fabulous and think you will too.  In fact, I may have been 'finding them fabulous' all day today!  ; )


Can you see the yummy caramel?  There's chocolate chips in there too!
 
Caramel Brownies

2 Devils food german chocolate cake mixes (update:  there was a mix-up when I wrote down the recipe, it really called for german chocolate cake mixes)
1 can evaporated milk
2 sticks (1 C total) margarine or butter
1 12-14 oz bag of caramels
1 bag chocolate chips
1.  Take bag of caramels and 1/3 C of evaporated milk, combine on low heat and stir until melted.
2.  Mix 2 cake mixes, 1 cup melted margarine, and 2/3 C evaporated milk and mix until the dough  holds together.  Press 1/2 of the dough in a large cookie sheet and bake at 350 degrees for 6 minutes.
3.  Remove from the oven and sprinkle with 1 bag of chocolate chips.  Pour melted caramel over the chips.
4.  Crumble leftover dough on the caramel. (You can gently pat it down some if you want.)  Bake 15-18 minutes.  Eat warm, chilled (great for summer), or chill in the fridge for 1/2 hour before eating.


Today's Fabulous Find...Caramel Brownies...Mmm!
 
One more thing:  I had an unexpected surprise today...
 
Last week Fireflies and Jellybeans announced a contest to design a new logo for The Iron Crafter Challenge on their blog.  I went ahead and made a few buttons to enter (it was so much more fun than cleaning) and it was announced today that my logo made the top three!  Fun, right?  
 
If you have a minute, click on over to Fireflies and Jellybeans (if you'd like to see my designs) and vote for your favorite, even if it's not mine. :) 

Pin It!

2.10.2011

Healthy Valentine Snacks

As Valentine's Day approaches, many of you, like me, may be looking for fun healthy snacks to supply for your child's Valentine's Day class party, or even to munch on at home or at work.  I've linked to the articles that I found helpful and listed their suggestions for healthy Valentine's snacks directly below the link.  I hope this will help you too!

Chocolate fondue and fruit
 
source
 
Healthy Valentines Day Snacks for the Classroom and Family
Fruit and yogurt dip
Valentine kabobs
Love punch
Jello cutouts
Heart-shaped sandwiches
 
Printable Valentine Fruit Stickers at Twig and Thistle

How to Provide Healthy Treats for a Valentine's Party
Heart-shaped pancakes
Strawberries
Heart-shaped quiches
Watermelon
Heart-shaped Jello jigglers
 
 Healthy Valentine's Day Treats for the Little One's
 Valentine's Day Kabobs
Strawberry Roll-ups
Mini Fruit Smoothies
 
Mostly Healthy Valentine's Treats
I-love-you Strawberry Pancakes
Yogurt Parfait
Cream Cheese Heart Sandwiches
Pink Berry Smoothie
Heart-shaped Kid's Pizza
Angel Berry Parfait
Chocolate Fondue with Fruit
 
This last link isn't specifically for Valentine's Day snacks, but has some good suggestions for healthy everyday snacks.
30 Healthier Snack Ideas for Kids
 
Today's Fabulous Find...Healthy Valentine Snack Ideas


Pin It!

2.05.2011

Soft Sugar Cookies and Candy Melt Flowers

Today my kids and I tried a new way to make edible flowers.  You might look at them and assume they're made with frosting, but they're actually made from Wilton chocolate candy melts and corn syrup.  


They're surprisingly easy to make and one batch will make a bunch of small roses.  (I still have a lot of the candy clay left.)   Shaping the petals can become a bit tedious after awhile, so you might want to turn on a movie to watch while you make them. :)


You could also write words with frosting on the white part of the cookies for fun.
 

I learned how to make these roses from Dawn at Because I Said So.  She has made a video tutorial on how she makes them and explains every step in detail.  Her roses are amazing!

A couple of things that I learned: 
1.  After I mixed the two ingredients there was some liquid in the bowl.  I tried to mix it in, but it really wouldn't mix back together.  If this happens to you, I think it would work best to just drain it before you wrap it up in the waxed paper.  Otherwise when it solidifies it stays white instead of taking on the food coloring. 

2.  When you are shaping the rose petals, if the candy gets too warm it won't work as well.  If you let it sit for a bit in-between steps it will turn clay-like again. 


For the leaves I took a green spice drop, flattened it with my fingers, tore it in half, formed each half into the shape of a leaf and then folded the bottom in half and pinched it together.


The sugar cookie recipe that I used is one you'll definitely want to try if you like soft cookies.  Trust me when I say these cookies are delicious!


 (source of clip art n/a)
 

Frosting them with cream cheese frosting from a can saves time and tastes good on the cookies.  


I used cinnamon hearts with a spice drop center to make this flower.   Normally I wouldn't put this many on one cookie, but thought it was fun to try it anyway. :)


 Today's Fabulous Find...Candy Melt Roses at 'Because I Said So'


Linking to these fabulous parties!
 

PhotobucketUndertheTableandDreamingKeeping It Simple
Beyond The Picket Fence
handmade projectsGet Your Craft On Tuesday


Pin It!

LinkWithin

Related Posts with Thumbnails