Showing posts with label fall. Show all posts

10.09.2012

Fall Grapevine Wreath with Pine Cone Flowers {Take Two}

When I finished making my first pine cone flower wreath I just couldn't chance hanging it outside on my front door so it was back to the drawing board.  This new version is very similar to the first (still loving the pine cone flowers) but it should withstand the wind and the rain a little better! :)


(The first version is still my favorite.)


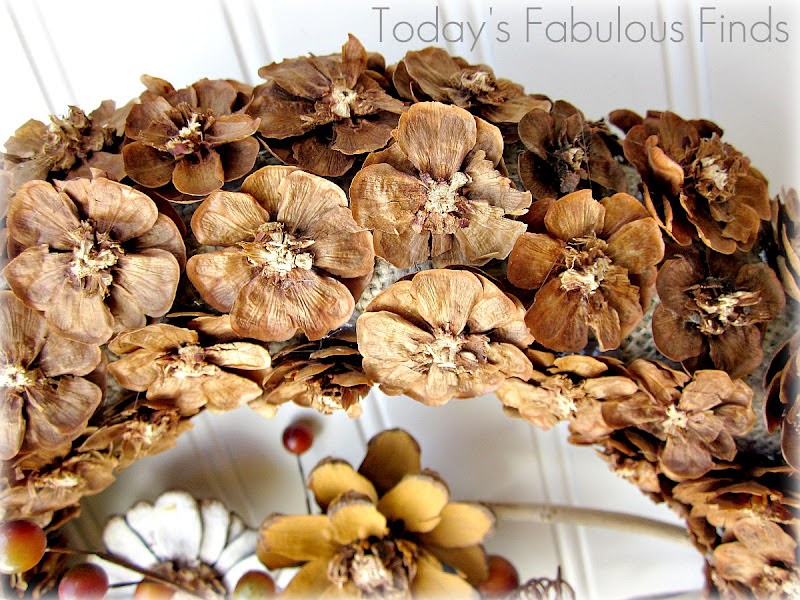
Click here for the post on the wreath pictured above, which includes a tutorial on how to make and paint pine cone flowers.


Fall Grapevine Wreath Supplies

Grapevine Wreath
Wood Letter
Ribbon
Pine cones
Three Berry Sprigs
Craft Wire
Hot Glue Gun and Glue
Craft Paint and Brush
Twigs
 Two Large Wreath Magnets (optional)
Clear Matte Acrylic Sealer (optional)


A few things about this wreath...
  • The grapevine wreath and berry sprigs are from JoAnn Fabrics.  I paid $2.50 for the grapevine wreath with a 50% off coupon and the berry sprigs were on clearance for $1 each.

  • The flowers and berries are glued to the sticks, but not to the grapevine.  I used wire to attach them so that I can use the wreath again for another holiday if I want.  (I don't have a lot of extra space to store large holiday items like this.)
  • I couldn't find twigs that were exactly the right shape that I needed so I broke some twigs apart and then hot glued them back together in the shapes that I needed. 

  • The wood letter was on clearance for $3.  It was white and I spray painted it black (to match the shutters on the house) and then distressed the edges with sandpaper.

  • The wreath is currently hanging on my front door with heavy duty wreath magnets (also found at JoAnn's) but I'm not sure if this is the best way because eventually the grapevine may just pull out or stretch.  I may change and use a wreath hanger at the top of the wreath instead.
  • To protect the paint on the flowers you can spray them with a clear matte acrylic spray.  (I forgot to and still need to spray mine.)


A few of you told me you were gathering pine cones to make pine cone flowers.  If you've finished your project and posted about it, leave a link to your post in a comment (if you'd like).  I'd love to see it!

Have a great day!



I'm sharing my wreath at these fabulous parties!
Pin It!

9.26.2012

Fall {Pine Cone Flower} Wreath Tutorial

Happy Fall!  Last year I showed you how I made a burlap bubble wreath for my decorative door, then how to spiffy it up with Fall flowers.  This Fall I really wanted to make a wreath to hang on my front door.  My original plan was to use the leftover pine cones from my Christmas centerpieces and just glue them onto a wreath form.  When I sat down to get started though one idea led to another and I ended up going in a whole new direction.  I could not be more pleased with the results!


I spent around $5 on supplies.   The wreath form was four dollars and I had to stock up on my supply of hot glue, everything else was from my stash...or from my yard...or from my Grandma's yard (she has TONS of the cutest little pine cones). 

The pine cone flowers in the center are quite fun to make and they are sooo easy to paint!  My mind is racing with all of the ways they could be used!


 How to Make a Pine Cone Flower Wreath

Supplies

Small Pine Cones (lots of them)
3 Medium Pine Cones
12" Foam Wreath Form or Larger
Burlap
Hot Glue Gun and Glue Sticks
Small Handheld Pruners
Large (tree limb size) Pruners
Paint:  Yellow, Orange, Vanilla, Brown
A Few Small Branches/Twigs
Ribbon to Hang It
Sprig of Berries
 Clear Acrylic Spray (Optional)

Directions


Starting at the bottom, use the handheld pruners to cut the small pine cones into flat sections. 
This will get VERY messy.  You might even want to cut them outside. 

*Watch your fingers and make sure you keep them out of the way of the pruners.


Use the tip of the pruners to clean up any damaged pieces of the pine cone around the center core.

Wrap burlap around the foam wreath form and hot glue it in the back.

Hot glue the little "flowers" to the burlap, just close enough to each other that they are touching.


Hot glue the sticks and berry sprig to the back side of the wreath. 

Double up a ribbon and loop it around itself at the top of the wreath.


'Candy Corn' Painted Pine Cone Flowers

Use a large set of pruners to cut the larger pine cones into flat sections.  Again, be very careful and make sure your fingers are out of the way, you might want to wear safety glasses too.  I had to quickly open and close the pruners repeatedly to cut through the core of the pine cone.


The flowers are painted in soft 'candy corn' colors with brown paint on the tips of the petals.  You can use any paint you have on hand and layer and mix colors to get just the shade that you want.  I chose not to paint over the dark brown color around the center of the pine cone. 

To weatherproof them, spray them with a clear acrylic spray.

Glue the flowers onto the twigs, using plenty of hot glue.


In December I'll remove the Fall flowers and ribbon and add a red ribbon and Christmas flowers for a whole new look.


So now I have a decision to make:  Do I hang it outside on my unprotected door like I originally planned
(where it will be rained on, tossed to and fro by the wind, and inevitably get covered in dust) or do I find a place for it inside? 


I don't think I could stand to see it get ruined, I love it too much! 

Have you ever made pine cone flowers?  If you haven't, do you think you'd like to give it a try?

If you liked this post and would like to pass the idea along to your blog readers or on Facebook or Pinterest I'd be thrilled!  (Sharing ideas is the reason I blog.)  You are welcome to use one of my pictures with a link back to this post if you'd like.  Thanks!

Today's Fabulous Find...Pine Cone Flowers


Sharing at these fabulous parties!

Fall Party
Pin It!

9.08.2012

A Dozen Craft, Decor and Recipe Ideas for Fall

Just in case you missed them...


 Fall Mantel and Shelf


I really like these Apple Streusel Cheesecake Bars, they've become a favorite of mine!  They make a delicious fall dessert recipe because you can eat them warm or cold.  Mmm!

We're enjoying beautiful weather this weekend, I hope you are too!

Pin It!

9.06.2012

5 Step Fall Stacker Blocks

The other day I was out on a drive with my family and saw that the leaves in the mountains are already starting to change colors.  It's hard to believe that Fall is already well on it's way! 


For my first Fall craft of the season, I decided to give stacker blocks a go.  I made up several different sayings but so far I only have one set that is finished and ready to show you.  These are simple to make and easy on the wallet.  I added up my cost and figure that I made this set for less than $1.25--not too bad!  (This was the cost for the wood and the ribbon, I already had the other supplies.)  I will be able to make 10 sets out of one 8' board (that cost around $1.30) and the ribbon (that was $3.99 for 9' at JoAnn's) will be enough for four sets.  I could have saved even more if I'd spent less on the ribbon or used a coupon.
 

'Fall Blessings' Stacker Blocks
(Measures 2 3/4" tall by 5" wide)

Supplies:
  • 9" length of a 1 3/8" square board (I bought one at Lowe's that was 8' long for only $1.28.  I can't remember what it is called, but it was one of the economical pine boards near the cutting area and the measurement was rounded up on the sign.  Be sure to pick through them and look for a board that is fairly straight.)
  • dark walnut stain and a rag
  • paint colors of your choice (I used vanilla, orange, and barn red.) and a foam brush
  • stencil or vinyl letters
  • sandpaper
  • ribbon (2 feet for each set)
Step One:
Cut the board into three pieces that measure 1 3/8", 2 1/4", and 5".  I used a miter box and hand saw.
Sand any rough edges.


Step Two:
Stain the wood using a rag or brush and allow to dry. 
(TIP:  Stain/craft over a garbage bag to protect your table.  When you are done turn the garbage bag inside out to use in your trash can.)


Step Three:
Paint the front sides of the blocks.
Sand edges to distress.

Step four:
Cut out a stencil (I used a Silhouette craft cutter) in contact paper or vinyl (or buy a stencil that is already done), place on the blocks, and paint over it.
 The font I used is called KG Skinny Latte and the leaf was converted to a stencil from a Microsoft image.


Step Five:
Lightly sand over the words to distress and tie a ribbon around the blocks.


I originally painted 'blessings' and the leaf black, but they didn't stand out enough.  I was fortunate in that I was able to reposition the original contact paper stencil to paint over it again in a vanilla color.  The stencil wasn't exactly in place so some of the black shows through.  In the end it was a lucky mistake and I really like how it turned out.


My 5 year old had another vision for the blocks--It's funny how our minds work so differently! :)


If you're looking for a simple craft idea for a craft night or a 'Super Saturday' craft day I think stencilled stacker blocks would be a fun choice.  I'm planning to wrap a few sets up in cellophane wrap and add a ribbon to give away as small 'thinking of you' gifts, I hope they like them! 


Today's Fabulous Find...
Fall Stacker Blocks for just over a Dollar


Pin It!

LinkWithin

Related Posts with Thumbnails