12.12.2012

Handmade Pine Cone {flower} Ornaments

It seems as though I'm still hooked on these little pine cone flowers!  Probably because they are free and so darn cute!  The other day I went to put away a package of foam balls that was leftover from my son's science project (a pretty fierce looking Black Widow Spider!) and found myself imagining them completely covered in adorable little pine cone flowers.  The thought got me so excited that I went to work and made a few.  Can I just say that I love how natural these pine cone ornaments look on my Christmas tree--love!


I took the ornaments outside to photograph them in better lighting-- 
sure wish I'd noticed that little strand of hot glue before I took the pictures!  
(You probably didn't even notice it and now I just pointed it out to you!)


They are simple but take some time to make.  It's a perfect time to watch a holiday movie--you can listen to the movie and look up enough to see what's happening, but you won't miss much if you need to focus on the project.  I suggest starting with The Twelve Dates of Christmas, have you seen it?  I thought it was a cute show.

Tip:  I set a sheet of (.30) poster board on my kitchen table to do my crafting on.  I can paint, stain, glue, and my table remains protected.  When I need to move the craft for dinner, I pick up the poster board with my project mess still on it and  temporarily move it to another location.  When I'm all done the poster board goes back out to the garage to be stored until the next project.

How to make Pine Cone {flower} Ornaments

Supplies:
  • 2 1/2" Foam balls (I bought mine at a dollar store, can't beat 8 for a dollar!)
  • Paint and Foam Paint Brush
  • Jute
  • Hot Glue Gun and Glue
  • Small 1-2" Long Pine Cones
  • Handheld Garden Pruners
  • Ribbon (optional)

Directions:

Paint the foam ball so the white foam doesn't show through the pine cones.  (Hindsight: Black paint might look better.)

Cut the pine cones into little flowers using small handheld pruning shears.  Tutorial here.

Hot glue into place, fitting them as closely together as you can.  (I tried to line them up as I went.)

Glue the jute hanger to the top then fill in with pine cones flowers.

Tie a ribbon bow and pin it to the top of the ornament with a straight pin.  (Or hot glue it on if you're sure you want it there permanently.) I was able to use ribbon from my stash.

*Use the tips of the pine cones to make the version pictured below.  You can make one of these for every two ornaments you make with flat flowers (approximately).


 If you have access to free pine cones (thanks Grandma!), ribbon, jute, paint, and hot glue on hand, and a dollar store that sells foam balls nearby (Dollar Tree), then you too are very fortunate and can make these ornaments for .15 each--not too bad!


The ornaments also look pretty hanging on a doorknob or in a basket/tray if you only have the time and/or patience to make a few!

Today's Fabulous Find...Handmade Pine Cone Flower Ornaments



If you like the Pine Cone Flower Ornaments, you might also like:

Sharing at...
Pin It!

12.04.2012

DIY Printable Paint Stick Ornaments: Names and Attributes of Christ

When I was choosing a name for this blog there were a lot of possibilities, but the name that seemed to fit the best was Today's Fabulous Finds--Tomorrow's Treasures.  I chose this name because I love the challenge of finding items that are ordinary, in-expensive (like paint sticks), or simply worn-out, and turning them into little 'treasures' for my home.  There is a satisfaction (and a happiness too) that comes when you use your creativity to make something that is uniquely your own!  That said, my greatest treasures in life will always be Jesus Christ and His gospel and my family.


I thought it would be nice to make something special with an emphasis on Christ for this Christmas season so I decided to make a new set of Paint Stick Ornaments for my Christmas tree.  This set includes 30 Names of Christ (pictured above) and 14 Christlike Attributes.  I also purchased over a dozen different 3"x 4" pictures of Christ to frame and hang on the tree alongside them.


The ornaments are really pretty simple to make and cost very little money.  They're made by photo copying black and white templates onto scrapbook paper and then Mod Podging them onto a 4" piece of a 5 gallon paint stick.  You can make four paint stick ornaments and a snowman ornament from just one 5 gallon paint stick.


The templates can be used in other ways as well:
  • Leave the wires off, attach magnets to the back, and use them for refrigerator magnets like the Teacher magnets that my sister designed.  
  • Make the ornaments/magnets into an inexpensive Christmas gift by tying three (Faith, Hope, and Charity for ex.) or four of them together with a pretty ribbon.
  • Tie an ornament onto a gift to use as an embellishment.

(My thanks to Amber M. for suggesting the words for the Christlike Attributes.)
  • When you copy the templates, decrease the size with the copier settings to use them for smaller magnets.  Use the width of the paint stick instead of the length.  (I haven't tried this, but I think it would work.)
  • Enlarge them with a copy machine then copy the names onto scrapbook paper and Mod Podge them onto a 2x4 piece of wood.  Add wire photo holders to the top to hold pictures of Christ and/or your family.


  • My plan is to put the ornaments in a basket and then each time a family member does an act of service for someone else they can choose an ornament to hang on the Christmas tree.  If you'd like to be more specific for smaller children you could even tape a slip of paper to the back of the ornament with the service already written on it.
  • Use them as an advent calendar by adding a scripture, storybook title, or a Christ-Centered Christmas activity to the back of an ornament for each day leading up to Christmas.  You could make the countdown as long or as short as you like.  Hang one ornament on the tree each day.


  • I chose not to add any Christmas clip-art to the names of Christ so that they can be used year round for various projects at home or at church, as well as for Easter. 
  • Make them as small signs (without the hanger wire) and group several of them together with a frame around them to hang on the wall.  This could be done without Mod Podging them onto the wood paint sticks, just copy them onto your favorite scrapbook paper and place the papers closely together under the glass in the frame in a patchwork pattern.

If you have any other ideas on how the templates could be used,
 please, please share them in the comment section!


Template Example

This is a low resolution image.
Do not use this, you will be disappointed.

 These Printable Templates are to be used 
FOR PERSONAL USE ONLY 
to use in your own home, church, or to give as a gift.

They cannot be used on any items for sale or profit, 
this includes fundraisers, sorry no exceptions.
  • Print the templates with your home printer onto white printer paper, using the normal or high quality setting.
  • Copy the template onto scrapbook paper using a copy machine.  Choose the paper you like, but keep in mind that lighter to medium toned prints that aren't busy work best. The red paper pictured below was too dark.  
 This is an important step.  If you print it on an ink jet printer and don't use a copy machine to copy it to the scrapbook paper, your ink will run and blur when you Mod Podge the paper on.  ( Exception:  If you have a laser jet printer you can skip this step and print it directly onto the scrapbook paper, I've been told that the ink won't run.)

Click here for the full tutorial.


Tips:
  • Adjust the copier to the darkest copy setting for nice dark letters and when copying on scrapbook paper with a texture.  
  • Use a Q-tip to apply distress ink around the edge of the paper.

I'm so happy to finally be sharing these with you, it took me awhile to get them done!  I hope that I've left you enough time with your busy holiday schedules to make them for your family, friends, or for your neighbors this year if you'd like, and that possibly they might even become one or your family's 'little treasures'.


"Because He came to earth, we have a perfect example to follow.  As we strive to become more like Him, we will have joy and happiness in our lives and peace each day of the year.  It is His example which, if followed, stirs within us more kindness and love, more respect and concern for others.

-Thomas S. Monson

Today's Fabulous Find...Names of Christ and Christlike Attributes Handmade Ornaments


You might also be interested in the first set that was posted a couple of years ago...


Pin It!

12.02.2012

HGTV's 31 Days of Christmas Crafts


Hi everyone!  Hope you're having a great weekend!  We just spent the day with my side of the family and had such a nice time.  I wanted to pop in quick to tell you about a fun Holiday Countdown that just started at HGTV.com called 31 Days of Christmas Crafts.  A Christmas craft from a blogger will be featured every day through the month of December including a full tutorial.  (One of my own favorite projects will be featured on the 4th!) If you follow the link below you can scroll through the months calendar to check them all out. They are festive and fun and I think you will love them!


Also, I just finished making a new set of Printable Paint Stick Ornaments with the Names of Christ and Christlike Attributes.  

Here's a sneak peek...


Watch for the Names of Christ Ornaments to be posted at the first of next week!  Enjoy the rest of your weekend!

Today's Fabulous Find...31 Days of Christmas Crafts


Pin It!

11.20.2012

Find me on Pinterest

It's taken me awhile, but I finally went ahead and joined Pinterest.  

Am I the last one? 

Any of you still holding out?   


I spent three evenings (and part of the day) going through all of my Google Bookmarks from the past three years, pinning the projects and recipes that I would still like to try/make.  


It was tedious (believe me) and I didn't know if I'd ever make it to the end of the list, but now that I'm done I can say that it was worth it.  It's so much easier and faster to find what I'm looking for now, this will be a great resource.


I'm excited to have another way to share all of my 'fabulous finds' with you!  If you'd like to come see what I've been pinning, you can find me on Pinterest here.

Hope you have a wonderful Thanksgiving!

P.S. I haven't posted much lately, don't give up on me. :)  I have a printable project in the works that has taken a lot of my spare time to put together and involves these.  Can't wait to show you!


Pin It!

11.07.2012

Pull-Apart Cinnamon Breadsticks and Dinner Rolls from one Delicious Recipe


More often than not these days when I want freshly baked rolls for dinner I buy a bag of frozen roll dough at the grocery store.  Occasionally though when I have a little extra time in my day I'll bake them from scratch.   Last week I finally got around to trying a recipe for Melt in Your Mouth Dinner Rolls at Sew Dang Cute Crafts that I'd bookmarked months ago.   My family LOVED them!


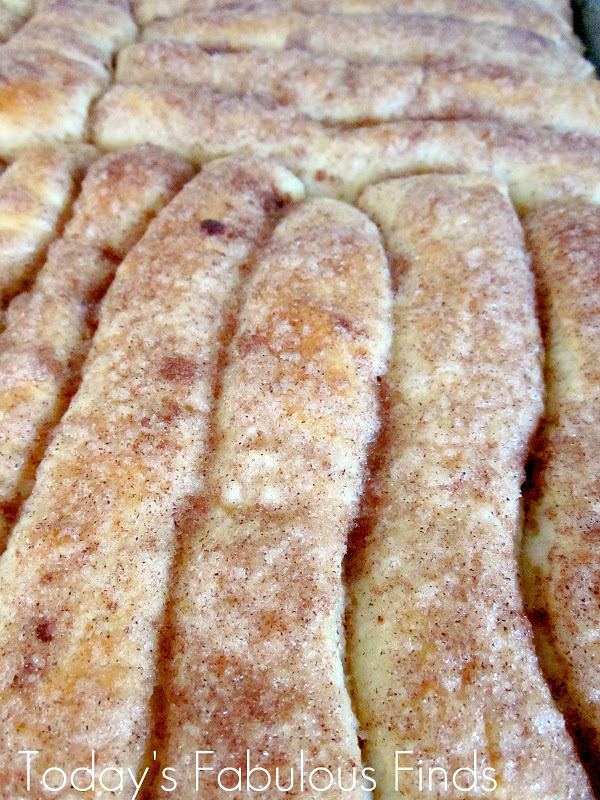
We all liked them so much that I made them again a few days later and took half of the dough and made it into pull-apart cinnamon breadsticks for dessert.  This roll dough recipe is large enough to make 12-16 rolls with one half of it and an entire cookie sheet full of pull-apart cinnamon breadsticks with the other.


Pull-Apart Cinnamon Breadsticks

Make one batch of roll dough.  Let rise.  When dough has doubled in size, divide in half.  Roll out one half of the dough into a circle to use for rolls and roll out the other half into a rectangle to use for pull-apart cinnamon breadsticks.

1.  Roll dough into a rectangle shape.  Use a pizza cutter to cut dough into 1" by about 6-7" long strips.
2.  Dip in butter (or brush on both sides) then in a mixture of sugar and cinnamon.
3.  Place on cookie sheet (you could twist them first if you like), cover, and rise to double in size.  Bake following the roll dough recipe directions or until fully done.  Store in a sealed plastic storage bag.


This is a simple roll dough recipe with basic ingredients and a great taste.  Thanksgiving is right around the corner (if you don't already have a favorite roll recipe you use) you might want to consider adding these rolls to your menu!  


Today's Fabulous Finds...
Melt in Your Mouth Dinner Rolls  
and Pull-Apart Cinnamon Breadsticks


Pin It!

LinkWithin

Related Posts with Thumbnails