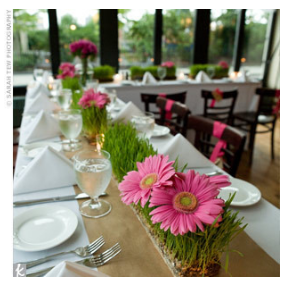
Hi there! I've got another really cheap upcycle project to show you--my very favorite kind (you probably knew that already). I need about 10 to 12 centerpieces for a church dinner in March. The challenge is always to get the most 'bang for our buck'. Through my searches I found myself drawn to wheat grass centerpieces with rustic wood boxes.
There are so many advantages of using wheat grass centerpieces, not only do they bring life and color to the table, but they can be made for just a few dollars (or less) depending on what you have on hand. You can't buy nice wood planters for anywhere close to that price (if you can even find them this early in the year in your area).
Just like the paint stick crate I made last year, there are endless possibilities of what you could fill this box with. Click here for a few ideas.
I took a walk around Lowe's in search of the cheapest rustic wood that I could find that would make a good planter. The winning piece was a 1"x4"x6' (really measures 3 1/2" wide) dog eared cedar fence slat for $1.09. You can make one 4 1/2" x 18" box out of just one slat.
Supplies:
- 1 dog eared cedar fence slat--1" x 4" x 8' (It really measures 1/2" x 3 1/2" x 6'.)
- Miter Box and Saw
- Wood Glue
- Sandpaper
- Tape Measure
- Staple gun and Staples (or small tacks)
- Clear Plastic (can use a shower curtain liner from a dollar store)
- Hammer and Nails ( 1 5/8", Ring Shank, Dark Brown )
- Dark Walnut Stain (optional) and a rag
Directions:
1. Measure, mark, and cut three 18" pieces from the slat. Measure from the straight end of the slat, the dog-eared end can be used to make a square box if you are making multiple boxes, so you might want to save it.
2. Line up the three pieces, one for the bottom, two for the sides.
3. Line the remainder of the uncut slat up to the end of the boards, making it flush with one side. Mark it and cut.
4. Run a line of glue along the side of the bottom. Line up the side (using the other side underneath it to balance it) and hammer into place. Repeat for the other side (using one of the ends to balance it).
5. Run a line of glue around the ends of both sides and hammer on the ends of the box, make sure you stagger the nails.
6. You can stop right here if you want a natural look, or you can stain it. I used a rag and Minwax Dark Walnut stain on this box.
To line it with plastic for use as a planter, push the plastic down into the box and fold the ends much like you'd fold the ends of a wrapped gift. Trim the plastic down if needed, fold the ends under, and staple or tack in place.
Please note: There is a strong possibility that when you water the grass, some of the water will trickle in-between the plastic and the wood and leak through the box (remember this is a rustic box). Don't set it on something nice that could be ruined if it gets wet. If you are using it outside, it would be a good idea to drill a couple of holes in the bottom of the box for drainage.
From what I've read wheat grass only needs about 2 1/2" of soil to grow. I took some of the dirt out of the box after I took these pictures to lower the soil level. I want the roots of the grass to be hidden by the box so only the pretty green is showing. I'm hoping this will work. Also, on the next boxes I plant, I'll put in a layer of sand or small rocks under the soil for drainage purposes.
This is my first time growing wheat grass, but it seems (again from what I've read) that it's pretty hard to mess it up. These are the steps I've followed up to this point (the end of day three).
1. I soaked the wheat (some call them berries, others called them seeds) overnight (8-12 hours) in a bowl of water. The wheat swelled up and doubled or tripled in size.
[Edited to add: You can buy the wheat in the bulk food section at a grocery or organic food store. The variety I used is called hard red wheat. It's the same wheat that you would buy to grind into wheat flour.]
2. I poured some water over the soil in the planter so it was wet but not soggy, drained the water from the bowl of wheat, and spread the wheat over the dirt. I put it on pretty thick so I'm watching it to make sure it isn't so thick that it will grow mold instead of grass.
3. To keep the wheat damp, I sprayed it every so often with a squirt bottle, I think I watered it three times today (day three).
In the picture above you can see where I covered it with a piece of cardboard. Some say to cover it for the first two days, but I had extra wheat leftover in the bowl that was uncovered and it sprouted at the same time if not sooner, so next time I won't bother to cover it with cardboard. I did cover it with some saran wrap today though once I saw little sprouts. I think this help some to keep the wheat damp and the soil warm--we'll see! :) Update: The next morning it was starting to grow mold so I won't cover it with saran wrap next time.
So now as I'm writing this, I'm moving into day 4. Supposedly I'll have nice tall grass by day 8 or 10. (Right now that's hard for me to believe.)
I didn't want to be the only one having all the fun, so I'll be posting a picture each day (except Sunday) on my sidebar to show you how much it grows each day. We can all literally 'sit around and watch the grass grow' together. And If I fail...well then you'll know what not to do. :)
Have you had success growing wheat grass? Any tips for me?
Today's Fabulous Find...Rustic Wheat Grass Planters
Update:I've decided not to stop the post here. I'll continue to add pictures each day to show you how the wheat grass does and share anything that I've learned along the way. So onto the morning of day four...
Yep, that's mold you see there. I was so disapointed when I checked on the wheat grass this morning and saw it. I think it was probably a combination of over-watering and the saran wrap so I took the saran wrap off and held back on the watering. I used to start my flowers for my yard from seeds and have had this happen before. The flowers ended up growing fine, so I think there's still hope for the wheat grass.
You can see that by evening the mold wasn't as bad. It's exciting to see little green shoots coming from the wheat! I imagine if we'd had a sunny day today we would have seen even more growth.
I'll post day five on Monday. Do you think it will make it to an inch tall by then? Hmmm... ;)
Oh, and these are a couple of my inspiration photos.
Day five was overcast and cloudy (we didn't see any sunshine all day) yet the grass managed to grow--take a look!
Day six: It's amazing what a little bit of sun can do for a plant, the grass nearly tripled in height today. My kids were amazed at how tall it had grown just while they were away at school. They like to run their hands over it now and let it tickle their palms. I LOVE the color of new green grass. :)
Day Seven: I took a picture today in the afternoon because I wanted you to see how beautiful the color is. It really is this green! My kids now run their hands over the grass every time they walk into the room. I feel like we've cheated mother nature and spring has come early. I LOVE it!
Day Eight: It continues to grow and is even fuller than the day before. The grass blades have widened at the top and are full and thick.
Day nine: The grass is to it's optimal height today and would be just the right height to use for a centerpiece or for decorating in the home.
From my experience, what I read is correct, wheat grass is very easy to grow and grows very quickly at just 8-9 days from start to finish. Other than the mold scare on day four, it went really well. I learned to touch the soil with my finger to see if it needed water. If it was still damp, I waited to water it for awhile.
I highly recommend giving this a try, especially if you live in a colder climate and are ancy for Spring. :)
Update:
In response to a comment: Yes, you can trim it and will need to several times through the life of the grass. I just use scissors and 'give it a haircut'. Sometimes I take it outside, but if it's cold I just hold it over the garbage. The first box that I planted was ready to be thrown out on day 21, so it was green for around 2 weeks, but I think I over-watered it. The second set of boxes that I planted are on day 15. I'm keeping track to see if they do any better. A friend planted some in a deep pot and it has lasted for several weeks. I'm wondering if it's because it has more depth for the roots. The roots in the boxes eventually become so bound, that I think it stunts the growth of the grass, but I'm in no way an expert on the subject, so I could very well be wrong. :)
Click here for Wheat Grass Part 2: Growing Wheat grass on paper towels!


