5.31.2012

Our 'Branch' of the 'Family Tree'

The rain clouds finally went on their merry way so I was able to snap a few pics of my latest project.  It's another part of the gallery wall that I'm working on--I like to think of it as our 'Branch' of the 'Family Tree'.   


I found random silhouette images online for the purpose of this post but I will actually have black and white photos of my family in it, which I love.  I printed one of my husband and I together for the top frame and a picture of each of my kids for the four frames below.

(I would have used silhouette's of my own family if I wasn't already planning on using photos.)


Supplies:
  • Piece of a Dry Branch
  • Small Frames
  • Jute Twine
  • Hot Glue
  • Picture Hanger
  • Pictures
Directions:

Find a stick that is similar in shape to this one with one straight upper branch and one straight lower one (it's upside down in this picture).  You can leave it natural or spray paint it.  The color of mine is Heirloom White from Rustoleum.


I found these frames at a local craft store and bought five of them for $1 each.  They measure 1 1/2" x 2".

Hot glue a piece of jute onto the back.  Line up the ends one over the other so the frames will hang straight when you loop them over the branch.  (It might be necessary in some places to loop the jute over the branch first before gluing it to the frame.)


Print and cut your images to the size of your frame and tape them to the back.  This is an earlier version that I tried with the original black frames and a chevron print behind the silhouettes. 
 

It's hard to tell in the picture, but the whole branch is only 12" long.


To hang it, I used one of the picture hangers that comes to a point on the end and hammers directly into the frame (or branch in this case.)  If you look to the right in the photo, you'll see a small piece of a branch that is hot glued to the back of the main branch.  This was added so the branch would hang straight with the wall.


I wanted the top frame to sit on the log, but didn't want it to fall off if it was bumped so I hot glued two loops of jute to the back of it.  I also hammered a nail into the wall right below the end of the branch to hold the weight so it would hang level.


I loved the detail on the frames, but it was lost in their dark color.  I brushed on some green paint (Valspar's Apple 4 in a sample size) and then used a wet paper towel to immediately wipe some of it back off to show the dark details.  I'm really happy with the outcome and love the brighter green color.

The chevron behind the silhouettes didn't look exactly how I'd envisioned it, so I printed them again with a white background instead for a cleaner look.


My Total Cost: $5

I imagine this family branch could also be a fun gift for grandparents with pictures of all of their grandchildren hanging from the branch.  Depending on the family you might need a much larger branch. :)


Today's Fabulous Find...
Pin It!

5.30.2012

Featuring: DIY Summer Flatware Caddy and a New PrintRunner Sticker Winner

I didn't hear back from the PrintRunner winner, so I've randomly selected a new one.  The new winner of the PrintRunner stickers is...

Heather B. who said:  What a resourceful idea!  I would love these stickers!

Congratulations Heather!   You will need to e-mail me by 12 pm tonight to claim your prize or I will have to select another winner.

DIY Summer Flatware Caddy

Tanya at twelve-O-eight took an ordinary thrift find caddy and with a little effort turned it into a fun and functional piece for any Summer BBQ!

My thanks to Tanya for permission to use this image.  Please PIN it from the original post, thanks!

Click over for the painting directions and to see a great before and after project! 

Today's Fabulous Find...DIY Summer Flatware Caddy


Pin It!

5.26.2012

Monogrammed Thrift Frame (before and after)

This is another frame that will be part of the gallery wall in my dining room.  It's taking me forever to get this gallery wall done but I think it will be worth it in the end.  It's finally starting to all come together!


I'm seeing that people are decorating with gold frames again/still and the sketch I think is actually kind of sweet, but it just wasn't what I was going for. 


I bought two octagon shaped frames for only $1.00 each at our local Deseret Industries (thrift store).  I actually Googled octagon frames for ideas and my frames came up in the search as 'vintage' from 1984 and are worth a whopping $12 each, woo hoo!  What I would like to know is since when are the 80's considered vintage?!  I feel so old.   

I'm working on refinishing the other frame as well and am waiting to receive an epiphany on how to finish it.  I have some ideas, but none of them so far have felt like they're 'the one'.


The gold finish needed a coat of grey primer first before the paint.  I spray painted it with Rustoleum's sage color spray paint.  It's the same color as the dollar store diva frame that I recently posted.


I followed Stephanie Lynn's tutorial for the monogram.  I cut out the vinyl with my Silhouette and then added a piece of burlap behind the glass.  I really like the texture that the burlap adds.


A Little Side Note

When I post about Silhouette (vinyl) projects I hope that it doesn't make any of you feel bad that want one but aren't able to buy one, I worry about that.  They're pretty pricey and it seems if you read craft blogs that everyone has one.

I've mentioned this before, but since many of you are new readers, I'm saying it again:  Enter the Silhouette giveaways!  It was a long shot (1 out of over 2,000 I think), but I actually won my Silhouette!  I entered 15 giveaways and even stayed up really late one night to do it.  It was the last comment that I left at nearly 4 am that won.  Was I extremely tired the next day?  Yes!  Was it worth it?  Definitely!  It never hurts to try, you never know, you might actually win.


To give it a distressed look, I used an ink pad (dark walnut) and the tip of my finger to apply the ink on the edges and corners.  The ink will just rub right back off, so it will need to be sealed with a clear acrylic spray.  You can use matte or gloss, whatever look you like best.

This is the fourth piece of the gallery wall that I've shown you.  The other pieces are the dollar store diva frame, the fabric covered magnet board, and the faux window.  It won't be a traditional gallery wall but I'm really excited with the direction it's going!


I'm curious, in my Google search I pretty much only saw 'vintage' octagon frames, have you seen any used in decor recently?  Would you hang one on your wall?

Today's Fabulous Find...$1 Octagon Thrift Frame


Linking up to:  House of Hepworths     Lil' Luna     I Heart Naptime 
Pin It!

Free Printable Gift Tags and PrintRunner Winner


We have a PrintRunner winner, scroll down to the bottom of the post to see if it's you! 

You're welcome to print these gift tags for your personal use if you'd like.  You'll need to save them to your computer and then print them as an image using the picture manager program on your computer, or you can insert them into a document to size them, edit and add names, and then print.


The image below can be printed as a borderless 4x6.


Our PrintRunner winner is Denise, congratulations!
*Please e-mail me by Sunday night to claim your prize.  Looks like you'll have those birthday party labels! :)


Pin It!

5.25.2012

Stenciled Job Board/ PrintRunner Giveaway is Ending Tonight

A quick reminder that the PrintRunner giveaway for 250 free stickers ends in less than 3 hours at 10 pm MST today.   (The entries are low so you have a pretty good chance of winning!) 

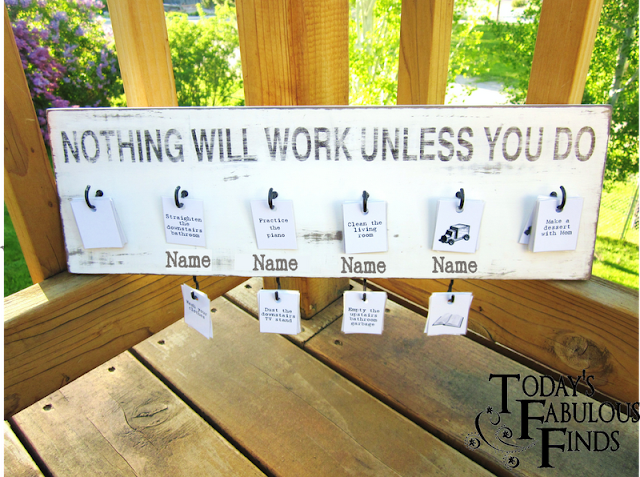
My kids last day of school was on Wednesday, so today I went through all of the tags on our job board and color coded them with stickers on the backs.  Each of my kids jobs and the jobs for each room has it's own color so it should be easier to sort through them when we rotate jobs each week.


This job board isn't as big as it looks, only 6" x 17", but it's been a huge help! 
You can link to the tutorial here.

I'll be back soon with a winner, and hopefully again tomorrow with a new project to show you!  I'm just hoping the rain clouds will part long enough for me to snap a few pictures. :)

Have a fun Friday Night!


Pin It!

5.21.2012

Featuring: Dripping Roast Beef Sandwiches with Melted Provolone


source

I've made au jus sandwiches many times over the years, but never with french onion soup until just recently, have you tried it?  It's really quite good!

We've eaten it with provolone cheese and with cheddar cheese, toasted and untoasted, and liked it all.  I'm not sure how I like the peppers though, I think it's a preference thing, but the french onion soup is the secret ingredient, it really makes the sandwich.  (You might even want to use more than one can of soup.)

This is a simple recipe to remember for a day when you don't have a lot of time to cook dinner.   Let me know how you like it if you decide to give it a try!


Pin It!

5.18.2012

PrintRunner Sticker Giveaway ($40 Value)

This giveaway has closed.

It's been quite some time since we've had a giveaway around here, so when PrintRunner e-mailed me asking if I'd like to give away some of their stickers to one of you lucky readers, I was all in!  This is what's up for grabs:

250 Stickers on Premium Sticker Stock

Details of the Giveaway Prize:  Stickers
Sticker Shape:  Standard Stickers
Flat Width: 2"
Flat Height: 3.5"
Quantity: 250
Paper:  Premium Sticker Stock
Colors:  Full Color (4 Color Process), Black and White
Proof: NONE
Ready to Ship In: 3 Business Days
*Giveaway is open to US Residents only, ages 18 years old and above. 
A winner is allowed to win only once over a two-month period.

"PrintRunner.com was established with little more than a small press and a dream. Ten years later our company became one of the foremost quality printers in Southern California. Our commitment to provide the best value and high quality full color printing at affordable price made our company grow. PrintRunner is a full service high quality printing company located in Chatsworth, California."

Ways to Use the Stickers 


When you order standard stickers at PrintRunner you will be asked to upload an image that is 2" x 3 1/2". 

This image could be anything:
Gift Labels
'Made in the Kitchen of' Food Labels
Your Business Card/Logo (great if you have a shop)
Holiday Gift Tags (include a family photo if you like)
Happy Birthday Gift Tags

I designed these simple tags (using a fake family) to give you a couple of ideas of what you could do with the stickers. There is a large amount of printable labels/tags that are free downloads from various sites that you could use if you don't want to design your own. 
Your stickers might say:
Made with Love By
Enjoy!
Just a Little Something From
Merry Christmas! or Happy Holidays!
Happy Birthday!

*It would be so easy to package small gifts in a brown paper bag, fold the top over, and then add a cute colorful sticker to hold it closed, adding a personal touch to the gift.

You can try PrintRunner's sticker printing through their online printing services. 

How To Enter:
One Entry:  Leave a comment on this post

This Giveaway will end on Friday, May 25th, 2012 at 10pm MST.  
The winner will have 2 days to contact me (after their name is announced) to claim their prize or another winner will be chosen. 
If you leave me your e-mail, I'll contact you if you win.

Good luck!

*Disclaimer: Thank you to PrintRunner for providing this giveaway, I will receive a set of stickers of my own for hosting this.


Pin It!

5.15.2012

Fabric Covered Magnet Board and Covered Glass Stone Magnets

I thought it would be fun to have a place to include random pictures of my family (the one's that usually end up on the refrigerator and then sometimes on the floor) as part of the photo gallery wall I'm working on.  I decided on making a fabric covered magnet board.  They're kind of fun to make, have you made one before?


They're easy to personalize (with fabric and frame choices) and are a great way to use frames and fabric remnants that you might already have on hand.  I think a framed magnet board would also be a great inexpensive small gift idea.

You can print the quote here at Poppies at Play.

I bought the frame for $2 at a thrift store and then painted it with Rustoleum's oil rubbed bronze spray paint.  The corners are all chipped up, but the dark paint hides it well.  The details on the frame match the mirror that I showed you here and is the same fabric I used to hang the moss wreath.


How to Make A Fabric Covered Framed Magnet Board


You can buy small squares of flashing? at Lowes for .56 each (they're used for roofing and are next to the rolls of sheet metal).  For a small project it's cheaper than buying a full roll.  I had to trim one of them with tin snips (wear gloves) so that it would fit.  I sprayed the frame's cardboard backing with spray adhesive glue and then stuck them on.


Press the fabric first with an iron so that it's wrinkle free then place the metal backing over the fabric (right side of the fabric down).   Bring the fabric to the back and glue it in place, pulling it tight as you go.

How to Make Fabric Covered Glass Stone Magnets


I've Mod Podged paper onto the back of glass stones many times so this time I wanted to do something a little different and glued fabric over the top of them, I really like how they turned out.


The magnets I used are strong enough to hold a 4x6 photo but one a little larger would have been even better.


My magnet board is already filled with snapshots of my kids and a recent certificate of achievement from school and will be a place where we can proudly display the kids drawings as well--it's great!


More projects will be coming--I've just got to make up my mind on how I want to finish them.  Sometimes that's harder than actually making them. :)

Today's Fabulous Find...Fabric Covered Magnet Boards


Linking up to:  Lil' Luna
Pin It!

LinkWithin

Related Posts with Thumbnails